OpsAI for Kubernetes
OpsAI helps your team detect production issues in Kubernetes fast, find the root cause, and either propose or apply a safe fix. It observes your services through APM, RUM and Kubernetes telemetry, correlates stack traces and error context with the right code lines, then provides a ready-to-apply fix. For Kubernetes workloads, OpsAI can skip the pull-request step and execute an Auto Fix directly when you choose to do so.
How OpsAI applies fixes in Kubernetes
After detection and root-cause analysis, OpsAI can propose a fix you apply yourself or execute an Auto Fix that modifies the Kubernetes object directly. This removes extra review steps for infra-level faults while keeping developer control for code changes.
Install OpsAI on Kubernetes
Replace the placeholders with your values:
global.mw.apiKey→ your Middleware API keyglobal.mw.target→ your region endpoint (for examplehttps://<your-uid>.middleware.io:443)global.clusterMetadata.name→ the name you want to see under Infrastructure
Choose one of the following installation methods:
Helm (recommended)
# Add the Middleware Helm repo
helm repo add middleware-labs https://helm.middleware.io

# Install the agent with OpsAI and auto-instrumentation enabled
helm install mw-agent middleware-labs/mw-kube-agent-v3 \
  --set global.mw.apiKey=<MW_API_KEY> \
  --set global.mw.target=<MW_TARGET_URL> \
  --set opsai.enabled=true \
  --set global.clusterMetadata.name=<CLUSTER_NAME> \
  --set mw-autoinstrumentation.enabled=true \
  -n mw-agent-ns --create-namespace
Verify:
kubectl get daemonset/mw-kube-agent -n mw-agent-ns
kubectl get deployment/mw-kube-agent -n mw-agent-ns
One-line shell installer
MW_API_KEY=<MW_API_KEY> \
MW_TARGET=<MW_TARGET_URL> \
bash -c "$(curl -L https://install.middleware.io/scripts/mw-kube-agent-install-v3.sh)"
Update OpsAI
Helm upgrade
Use helm upgrade --install to roll forward while keeping your namespace and configuration:
helm upgrade --install mw-agent middleware-labs/mw-kube-agent-v3 \
  --set global.mw.apiKey=<MW_API_KEY> \
  --set global.mw.target=<MW_TARGET_URL> \
  --set opsai.enabled=true \
  --set global.clusterMetadata.name=my-k8s-cluster \
  -n mw-agent-ns --create-namespace
Check status:
kubectl rollout status ds/mw-kube-agent -n mw-agent-ns
kubectl rollout status deploy/mw-kube-agent -n mw-agent-ns
Shell install path
The shell installer does not support in-place upgrades. Re-run the one-line installer with the new values to reinstall the agent.
Quick troubleshooting
OpsAI is not enabled
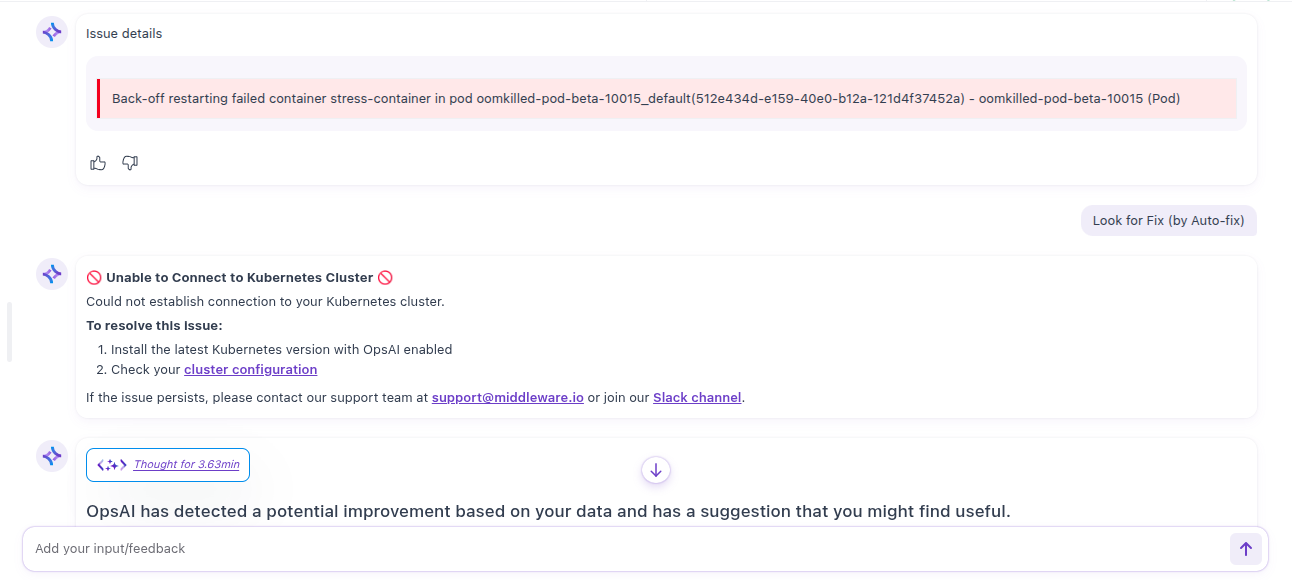
If the agent is not installed with OpsAI enabled, the OpsAI panel will show an error, such as Unable to Connect to Kubernetes Cluster with guidance to install the latest Middleware Kube Agent with OpsAI and to check your cluster configuration.

How to resolve:
- Install the Middleware Kube Agent with
opsai.enabled=true(see the installation section). - Confirm the cluster name and target are correct.
Verify the agent is running:
kubectl get daemonset/mw-kube-agent -n mw-agent-ns
kubectl get deployment/mw-kube-agent -n mw-agent-ns
Common Issues
- No data in OpsAI: Confirm
opsai.enabled=trueand that egress toglobal.mw.targeton 443 is allowed. - Wrong cluster name: Set
global.clusterMetadata.nameto the label you want in the UI then upgrade the release. - Auth problems: Use a valid
global.mw.apiKey. Keys are case sensitive. - Agent not rolling out: Check image pulls and node tolerations, then fetch logs:
kubectl -n mw-agent-ns logs ds/mw-kube-agent -c mw-agent --tail=200
Need Help?
Need assistance or want to learn more about Middleware? Contact our support team at [email protected] or join our Slack channel.