SSO Login via Microsoft Entra ID
Overview
Microsoft Entra ID (formerly Azure Active Directory) is Microsoft's comprehensive cloud-based identity and access management service. This integration enables seamless Single Sign-On (SSO) authentication for Middleware, allowing your organization to centralize user authentication and access control. With Microsoft Entra ID SSO, users can access Middleware using their existing Microsoft 365 or Azure AD credentials, eliminating the need for separate login credentials while maintaining enterprise-grade security and compliance standards.
Integrate with Microsoft Entra ID to
- Single Sign-On (SSO) authentication using Microsoft Entra ID credentials
- Compliance with enterprise security policies and audit requirements
- Seamless integration with the existing Microsoft ecosystem and workflows.
- Supports both SAML and OIDC authentication protocols
Prerequisits
To configure SSO, you need:
Middleware
- You must be an owner of the account.
Microsoft Entra ID
- A Microsoft Entra user account with one of the following roles: Cloud Application Administrator, Application Administrator, or owner of the service principal.
SAML (Security Assertion Markup Language) Protocol
Enable SSO for Middleware in Microsoft Entra ID
To enable SSO for an application:
Sign in to the Microsoft Entra admin center as at least a Cloud Application Administrator.
Browse to Entra ID > Enterprise apps > All applications.
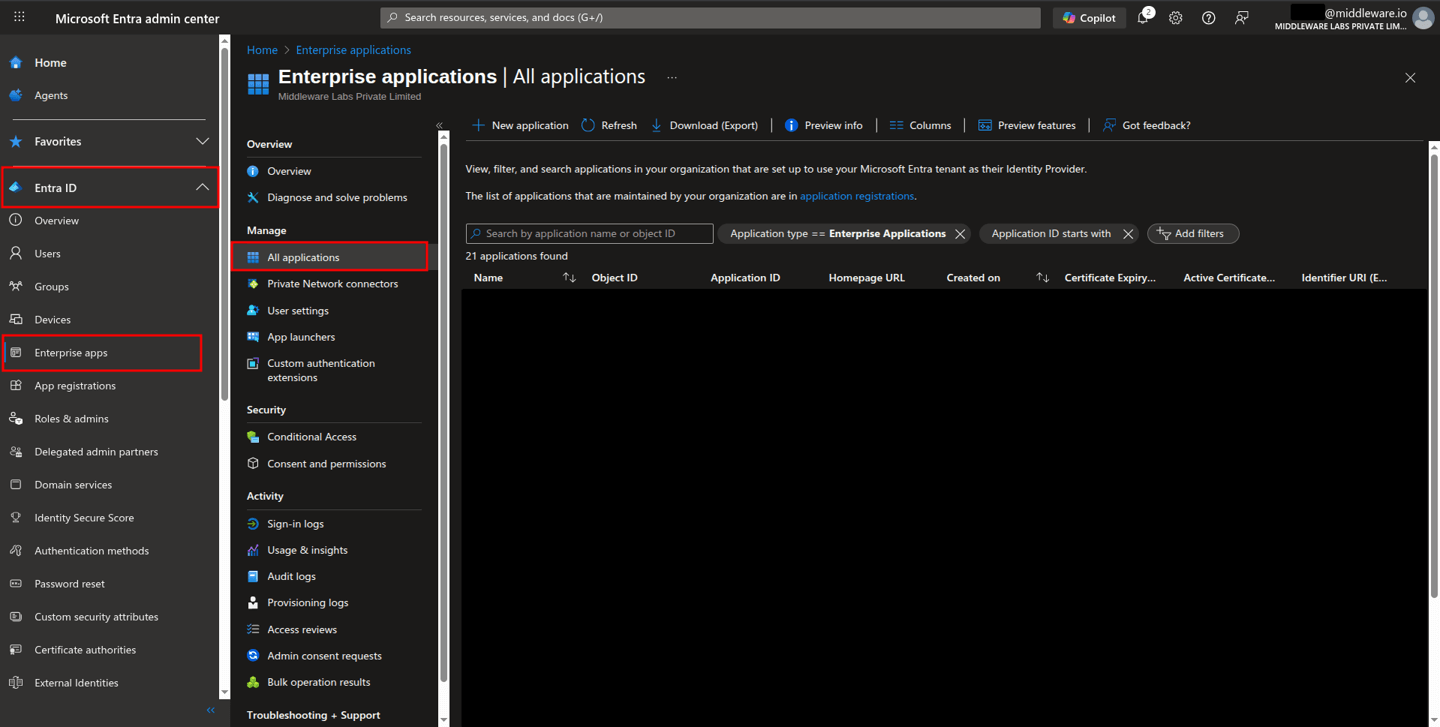
Select New application.
The Browse Microsoft Entra Gallery pane opens. Select Create your own application.
On the Create your own application pane, enter “Middleware” as the name of an app.
Select Integrate any other application you don't find in the gallery (Non-gallery).
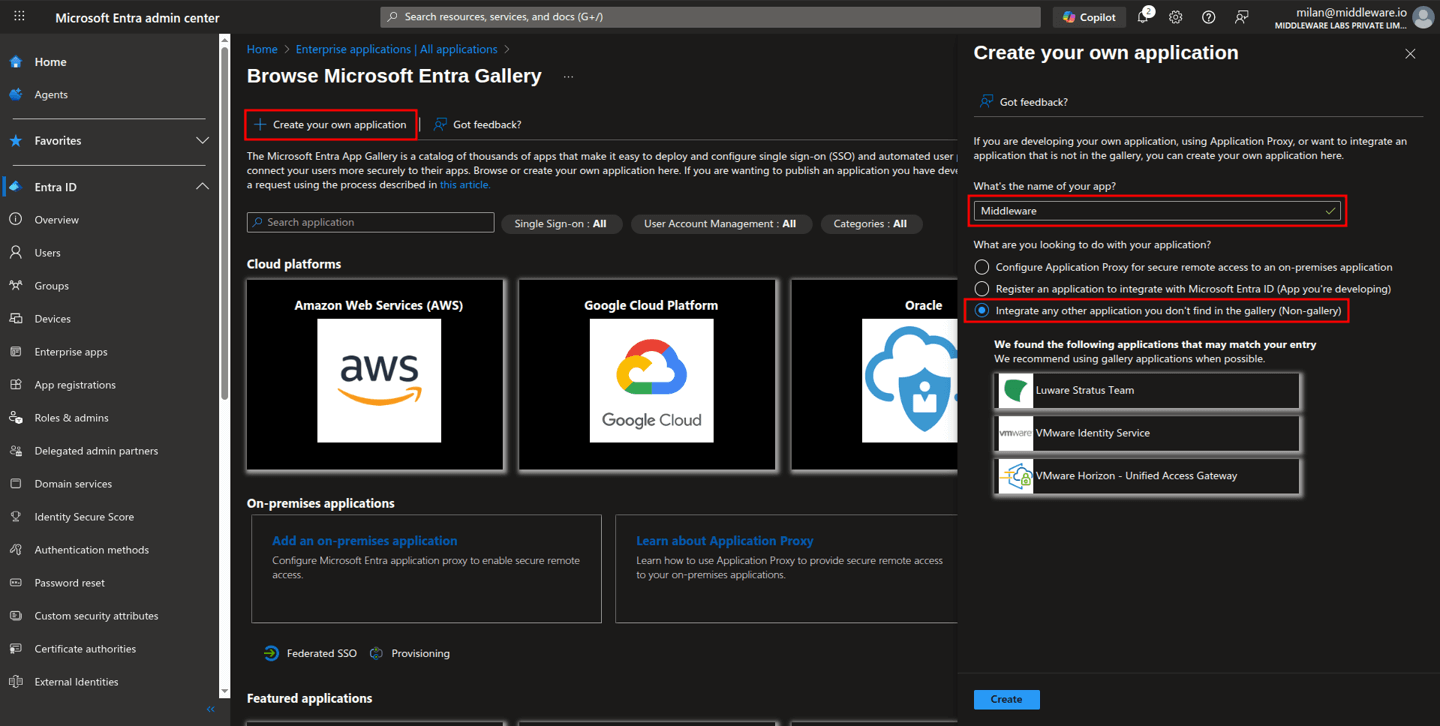
Select Create.
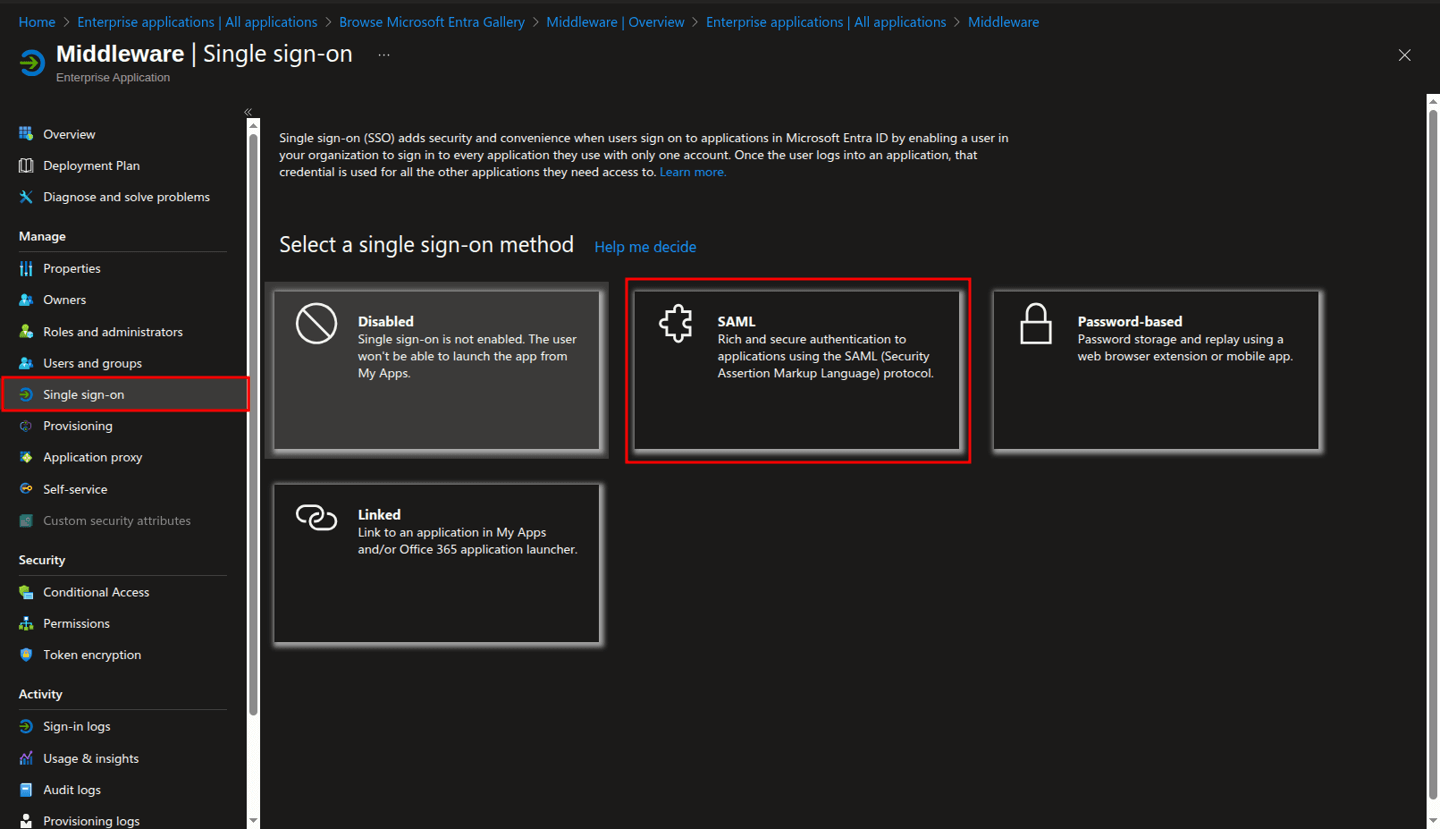
The app Overview page opens. In the left menu under Manage, select Single sign-on.
Under Select a single sign-on method, select SAML.
On the SAML-based Sign-on page, click on the Edit pencil icon of the Basic SAML Configuration section.
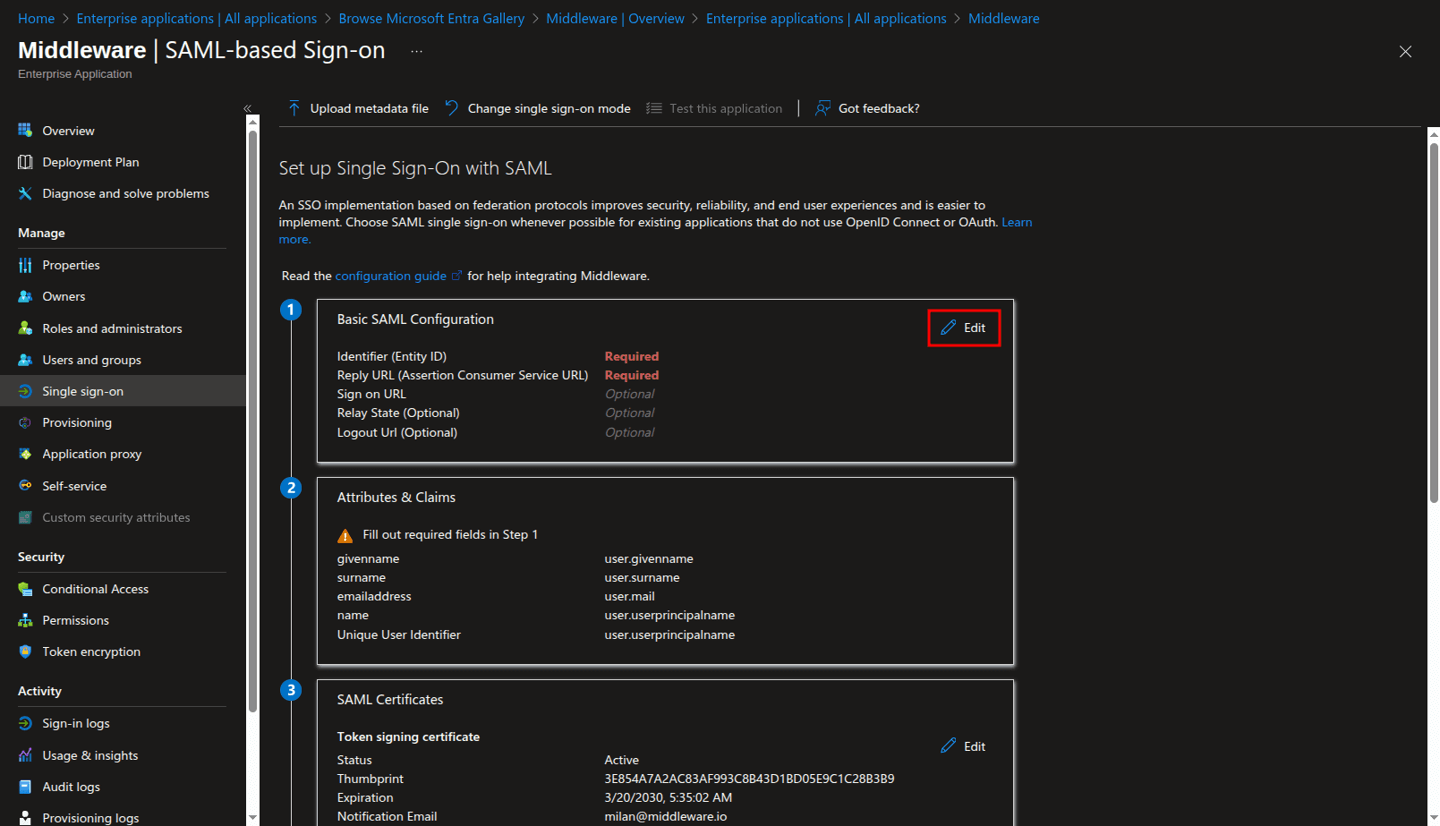
On the Basic SAML Configuration pane, enter the values described below in the respective fields, and then click Save.
a. Identifier (Entity ID):
https://app.middleware.iob. Reply URL (Assertion Consumer Service URL):
https://app.middleware.io/api/v1/auth/saml/acs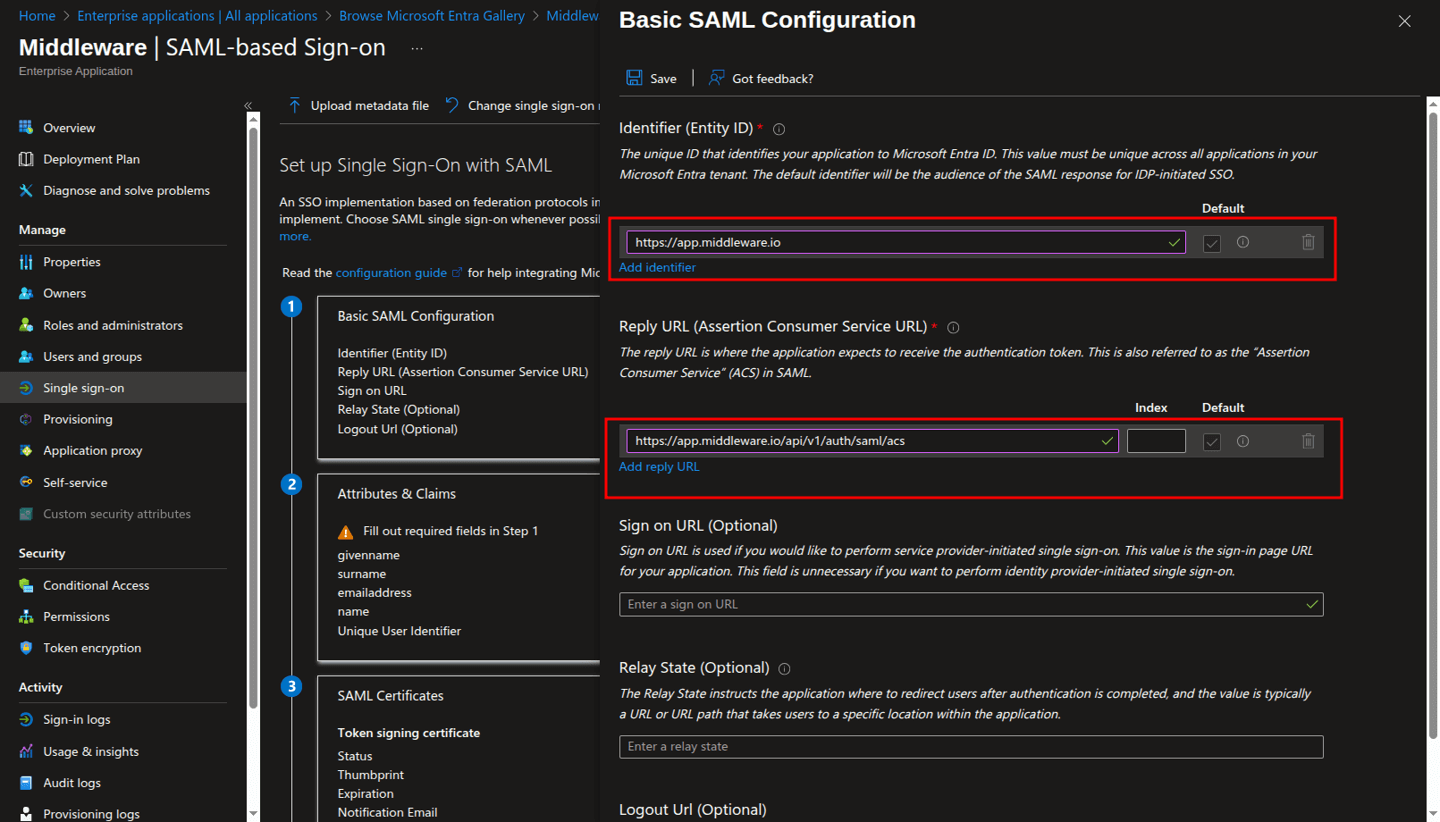
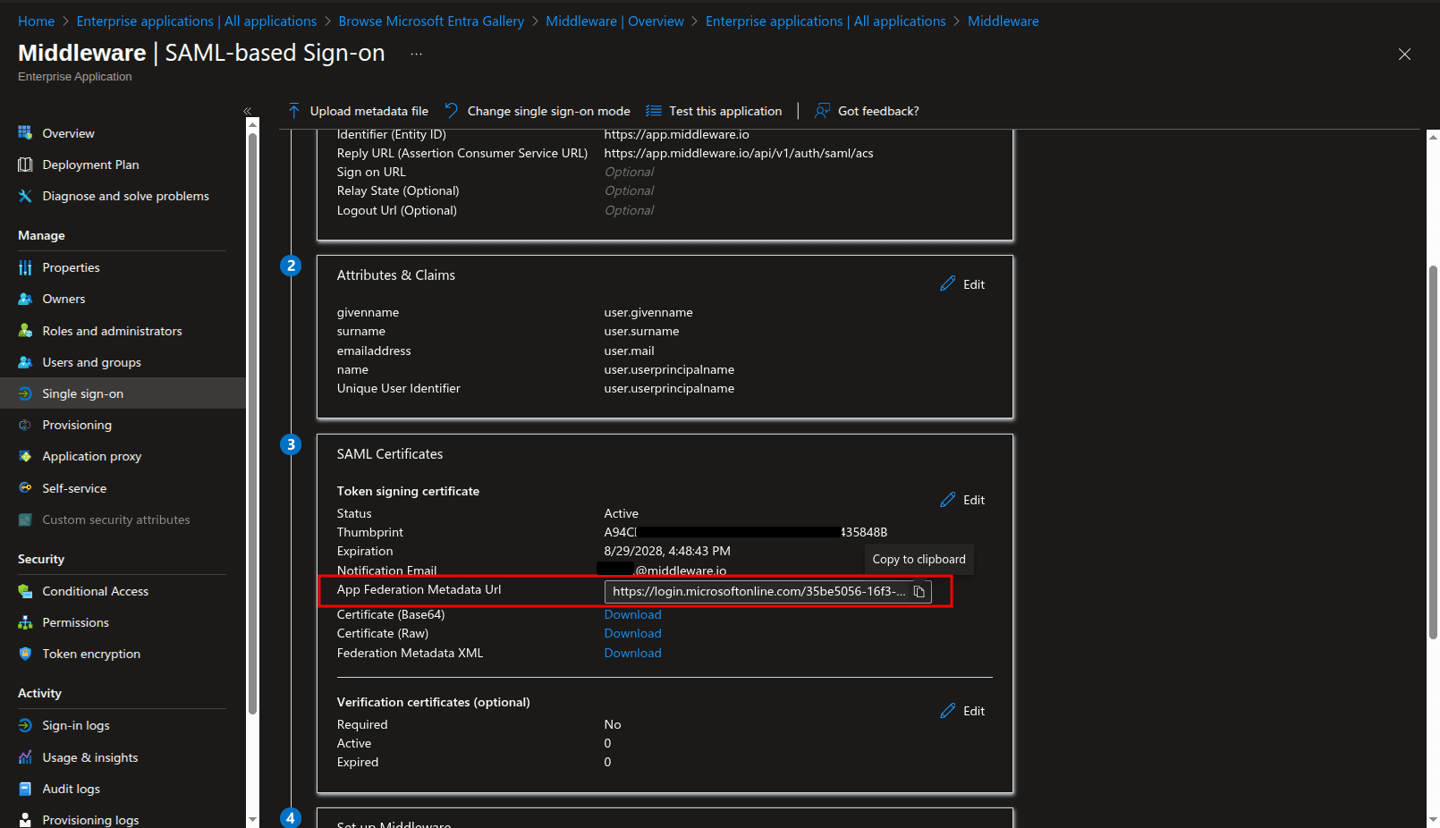
In the SAML Certificates section, record the value of the App Federation Metadata Url property to be used later.
Configure Microsoft Entra ID integration in the Middleware
To enable SSO login in the Middleware with Microsoft Entra ID:
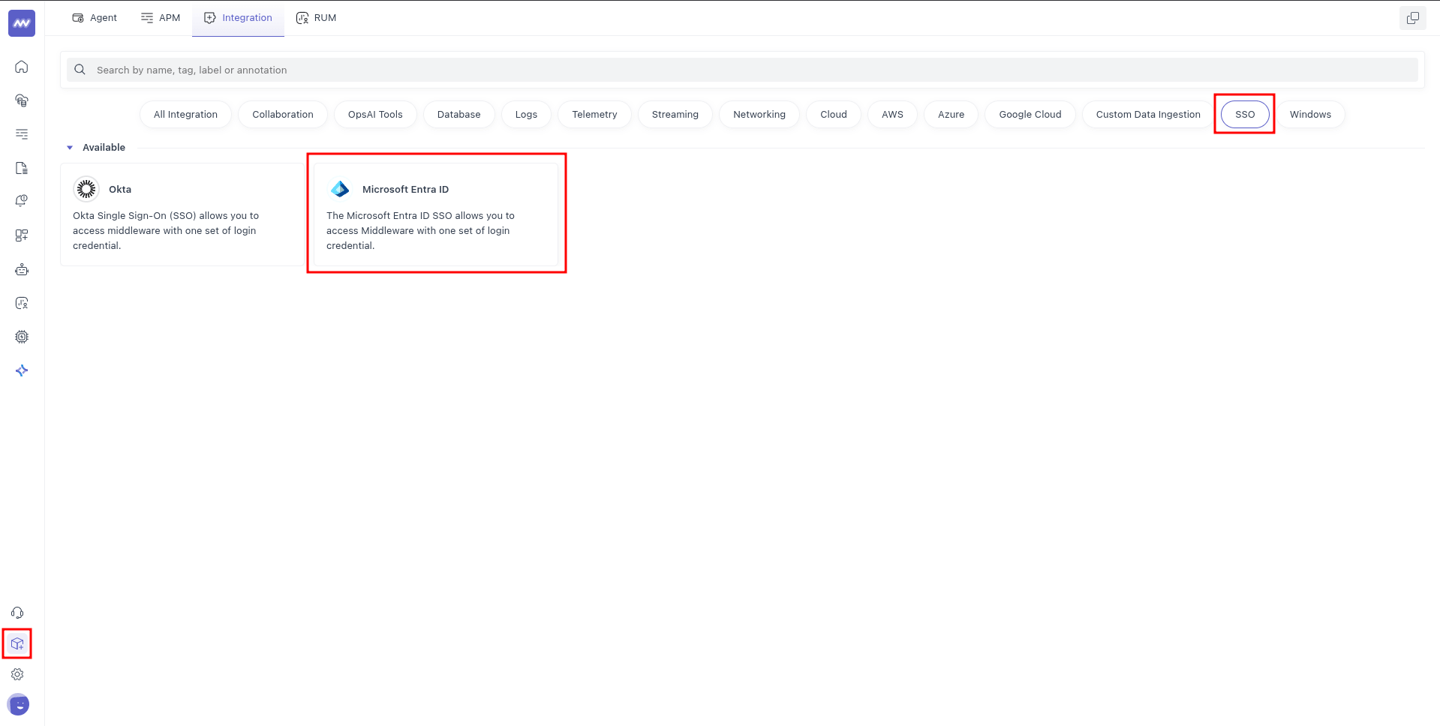
Sign in to the Middleware as an account owner.
Browse to Installation > Integration > SSO > Microsoft Entra ID.
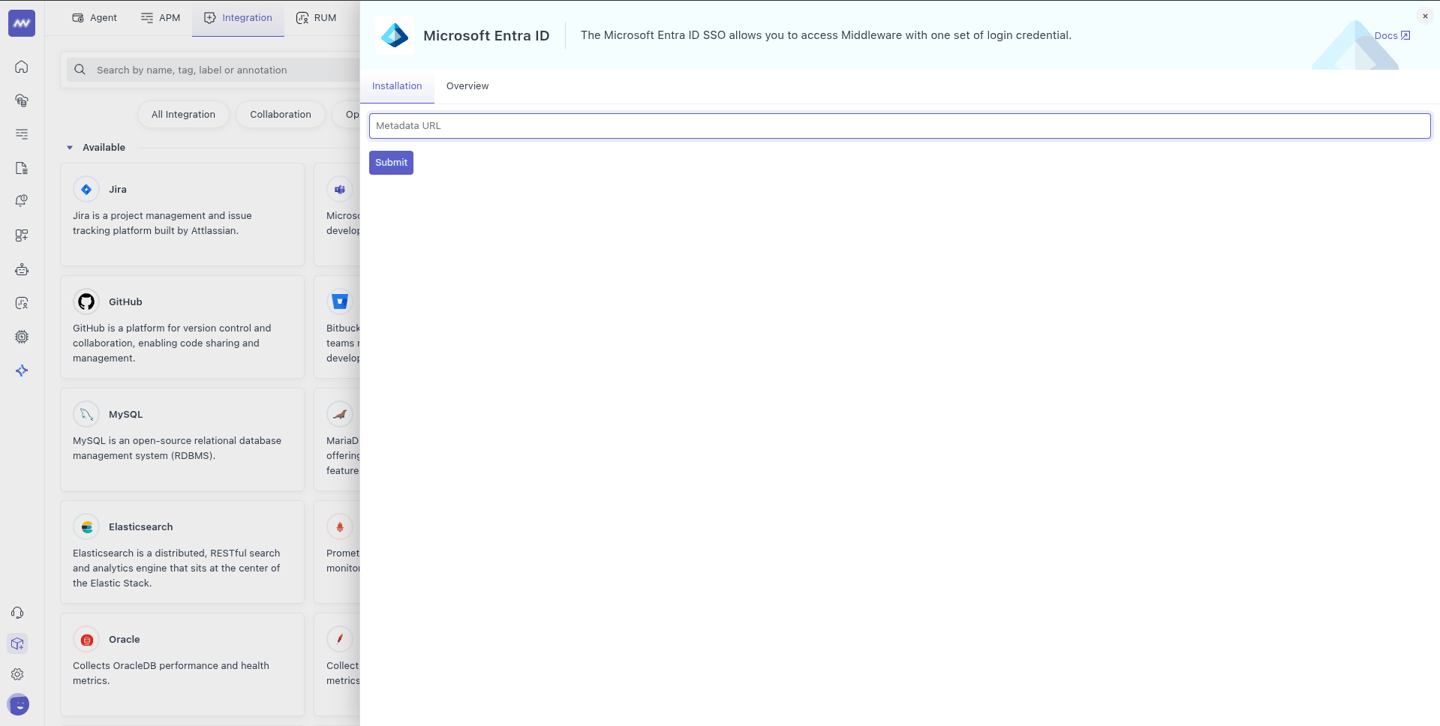
Select the SAML protocol.
Paste the App Federation Metadata Url that you recorded while configuring SSO in the Microsoft Entra Admin Center, and then click Submit.
OIDC (OpenID Connect) Protocol
Enable SSO for Middleware in Microsoft Entra ID
Register the application
Sign in to the Microsoft Entra admin center as at least a Cloud Application Administrator.
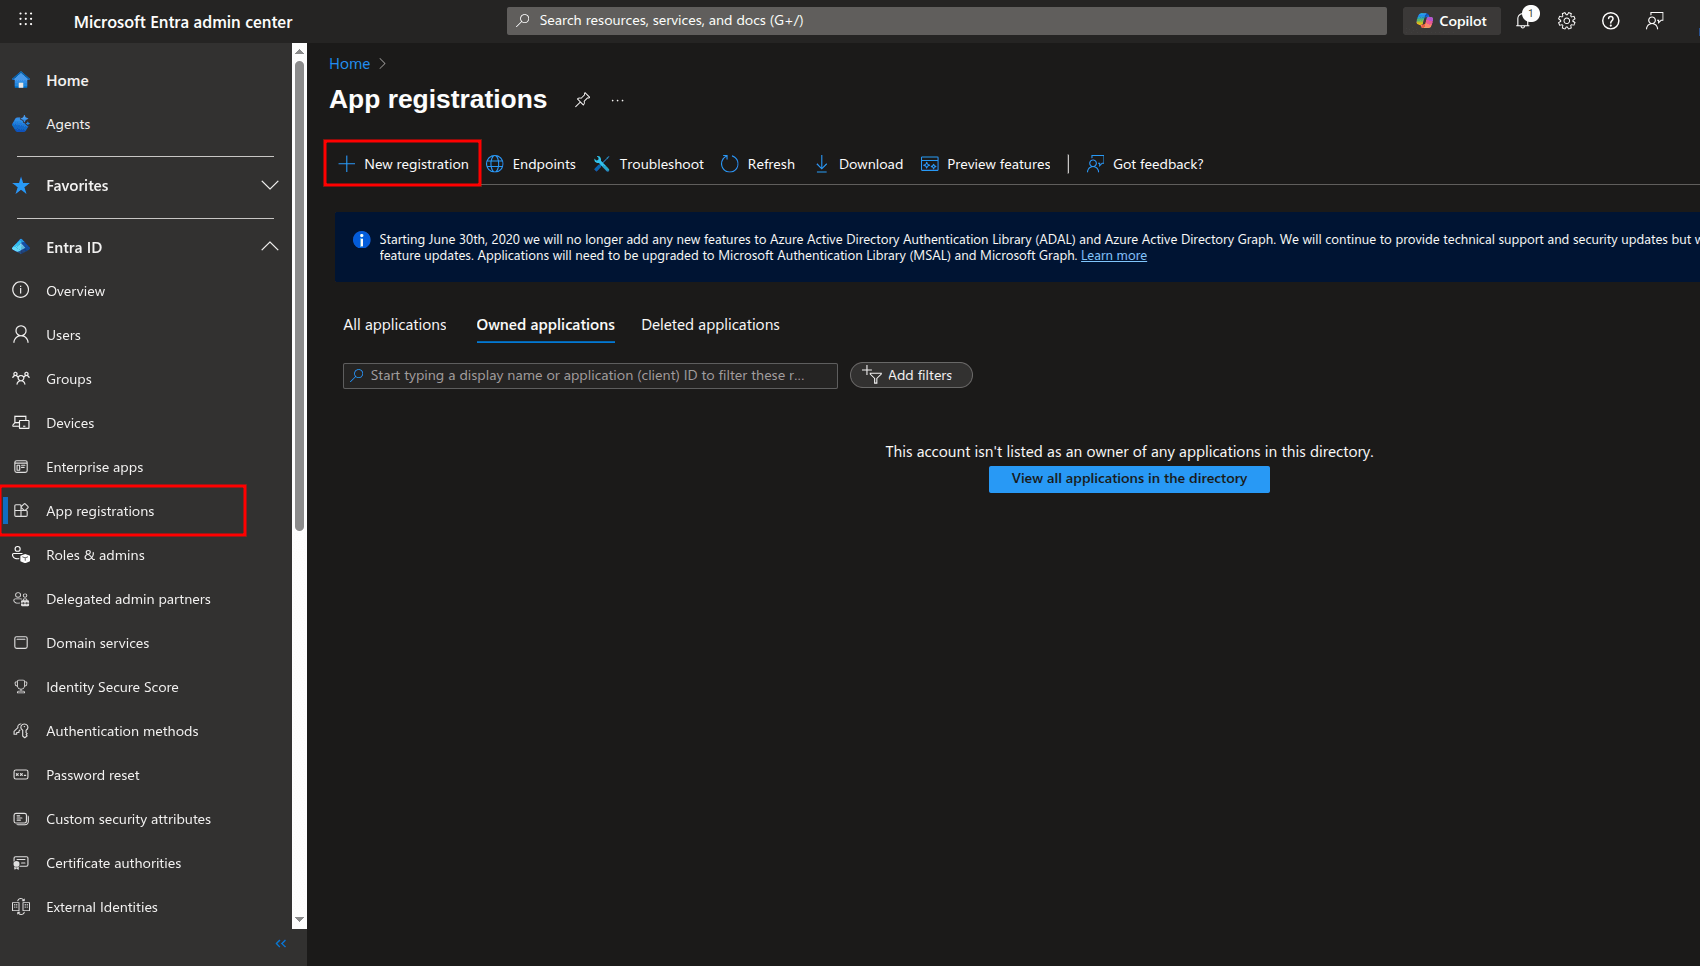
Browse to Entra ID > App registrations > New registration.
On the Register an application pane, enter “Middleware” as the name of an app.
Under Supported account types, select the Accounts in this organizational directory only option.
For Redirect URI, select Web as the platform type and enter
https://app.middleware.io/api/v1/auth/login/oidc/microsoft_entra_id/callbackas the redirect URI.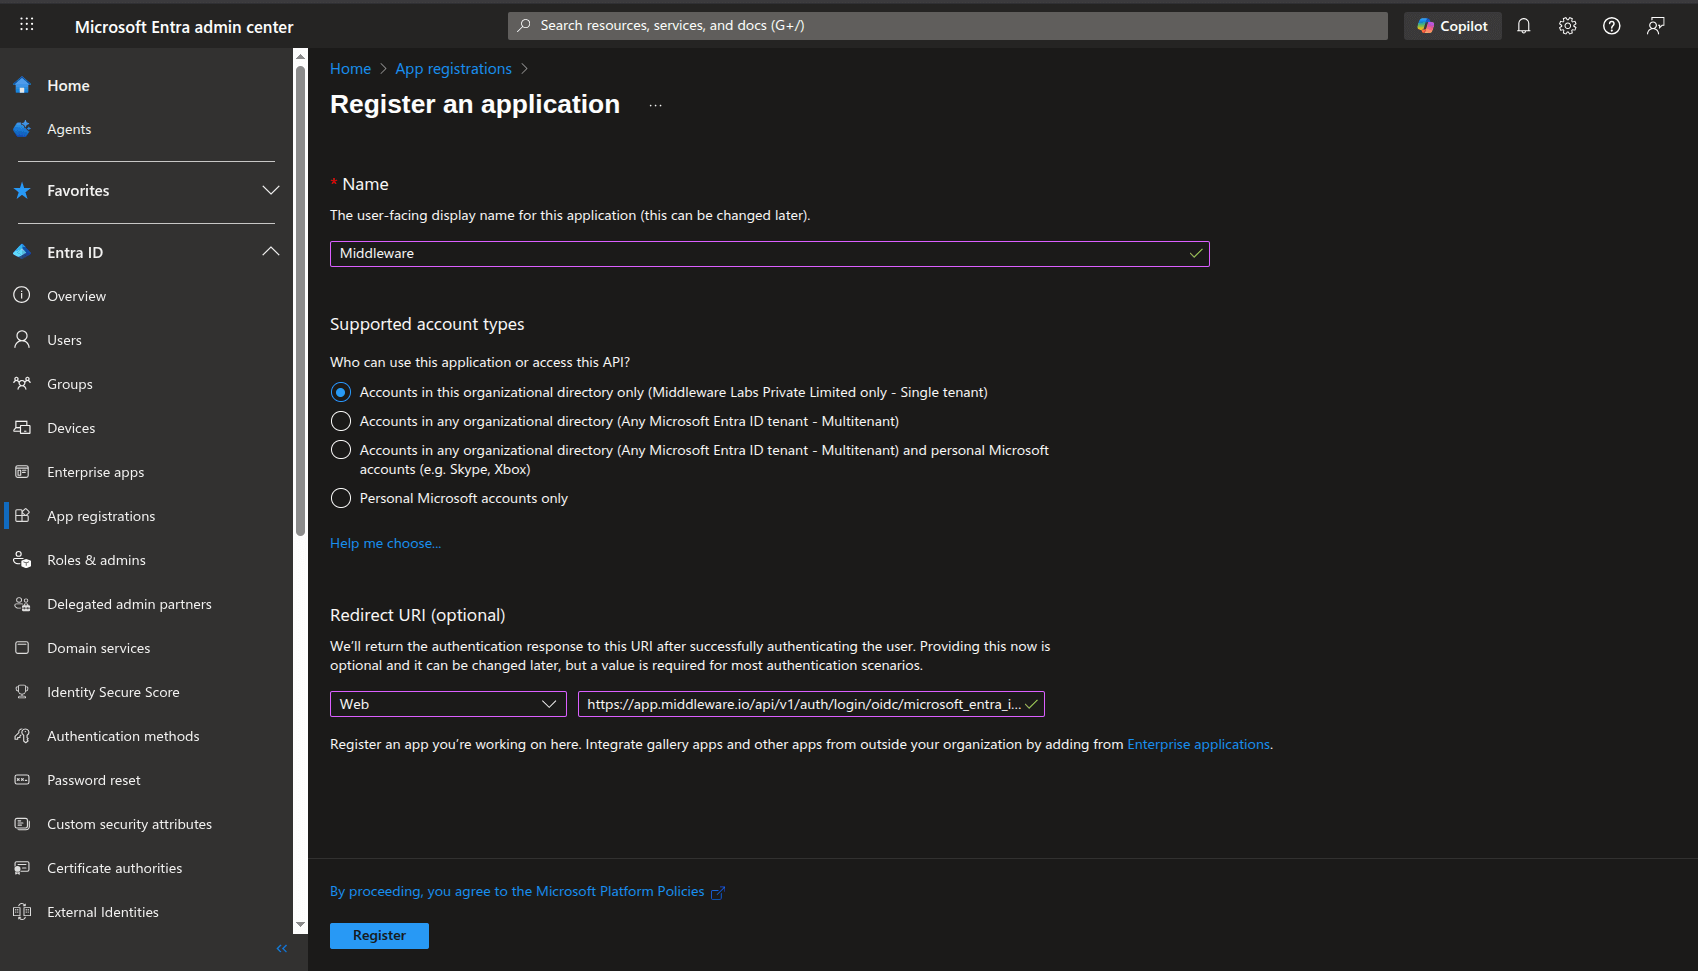
Select Register.
Configure client credentials
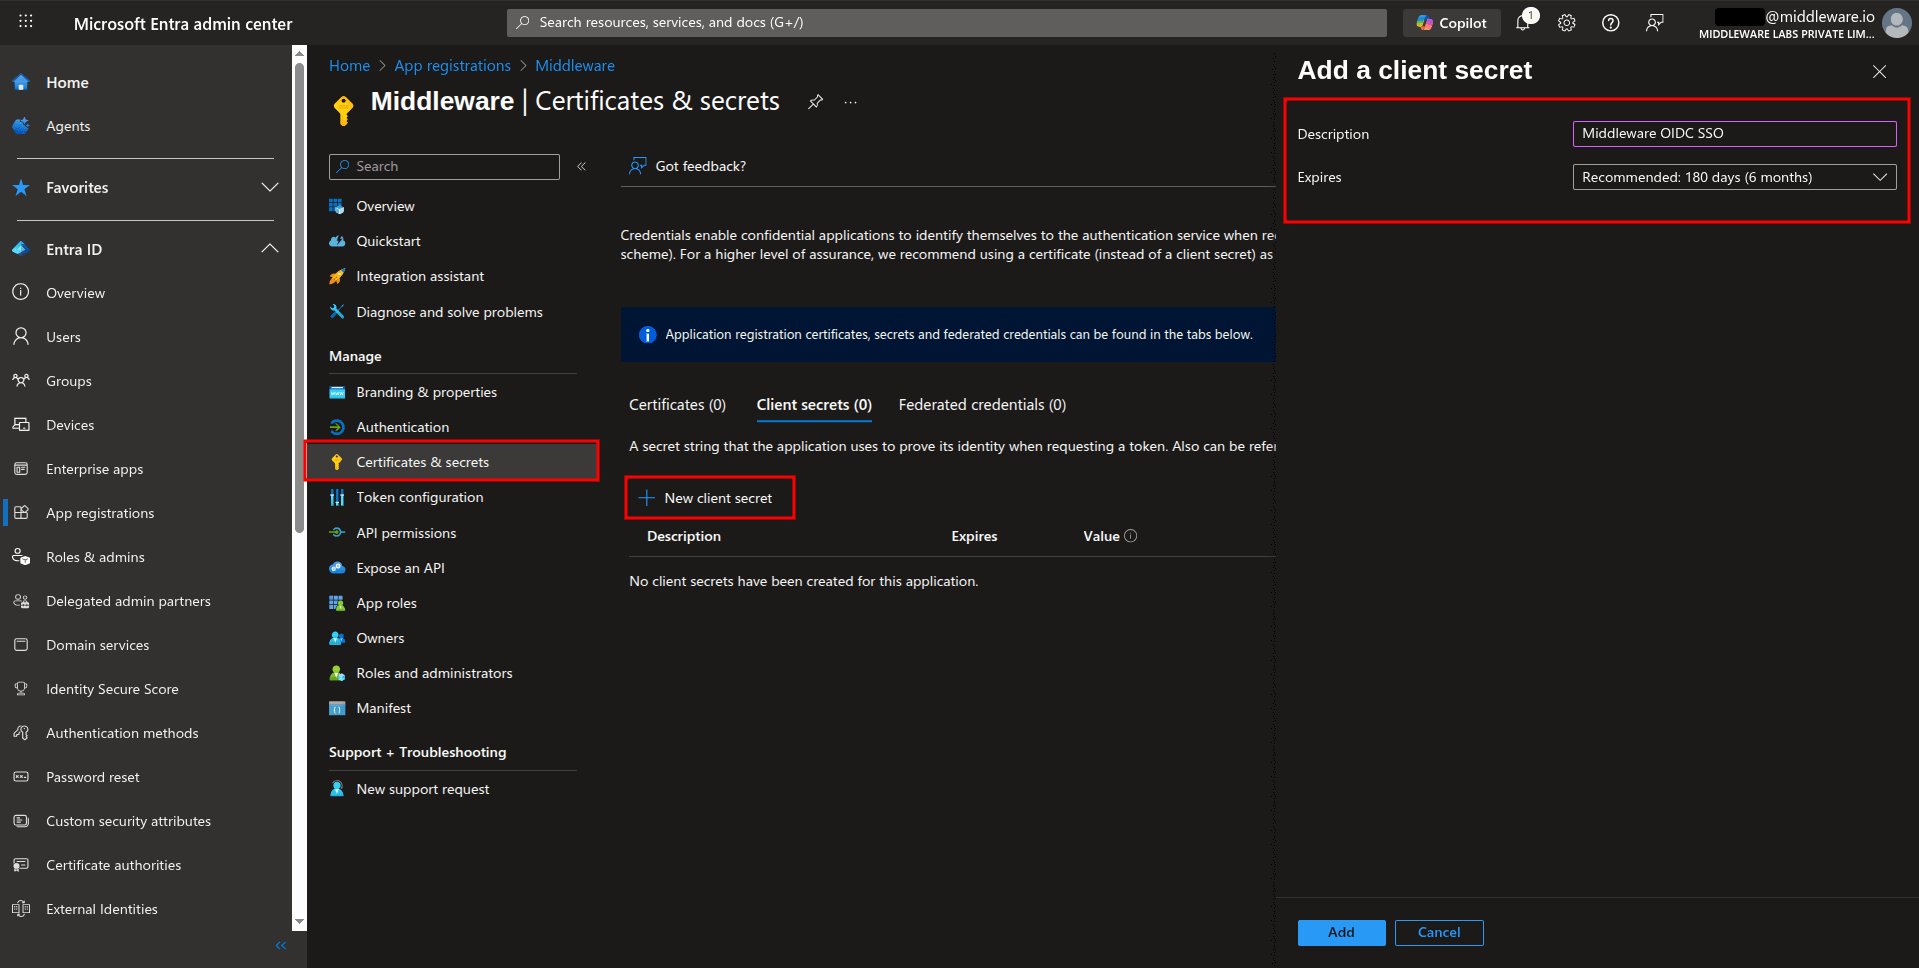
In the registered app, navigate to Certificates & secrets.
Select New client secret. Add a description and select an expiration period.
Select Add and copy the secret value immediately (it can't be shown again). Store this client secret in a secure place to be used later.
Configure API permissions
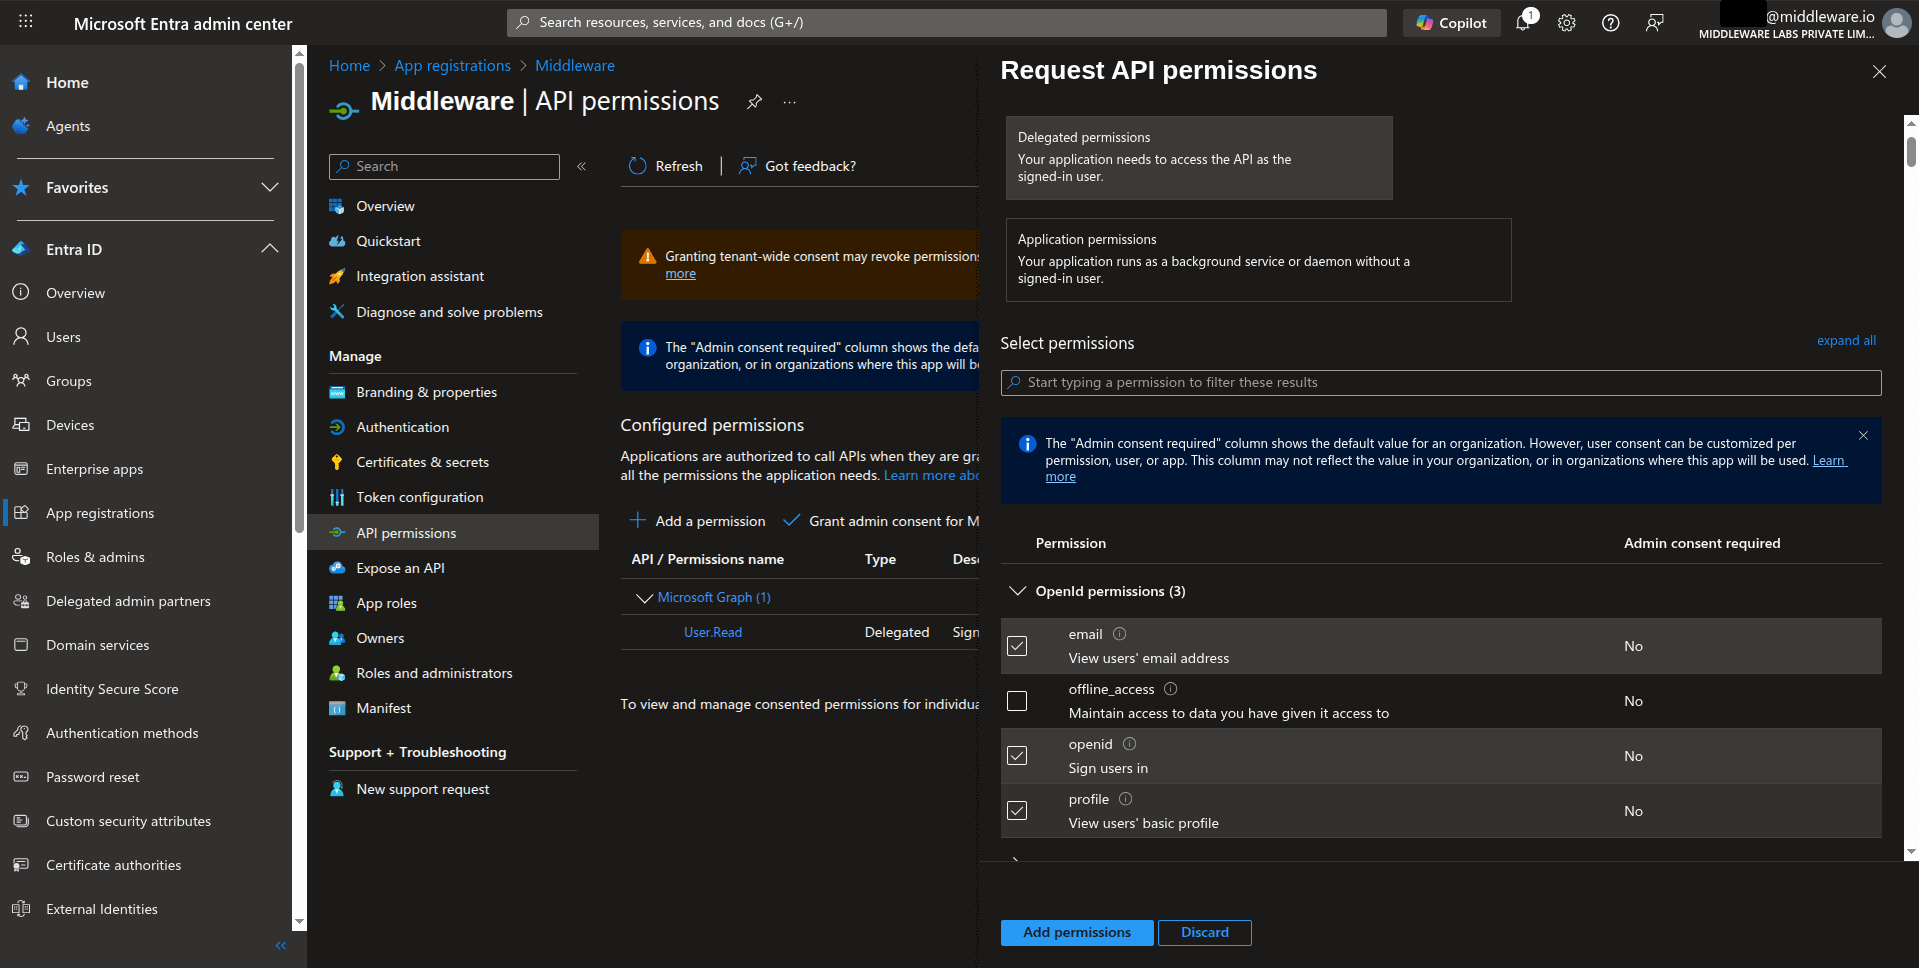
Navigate to API permissions.
The
User.Readpermission for Microsoft Graph is added by default.To add more permissions:
a. Select Add a permission
b. Choose Microsoft Graph
c. Select Delegated permissions
d. Search for and select openid, profile, and email permissions
e. Select Add permissions
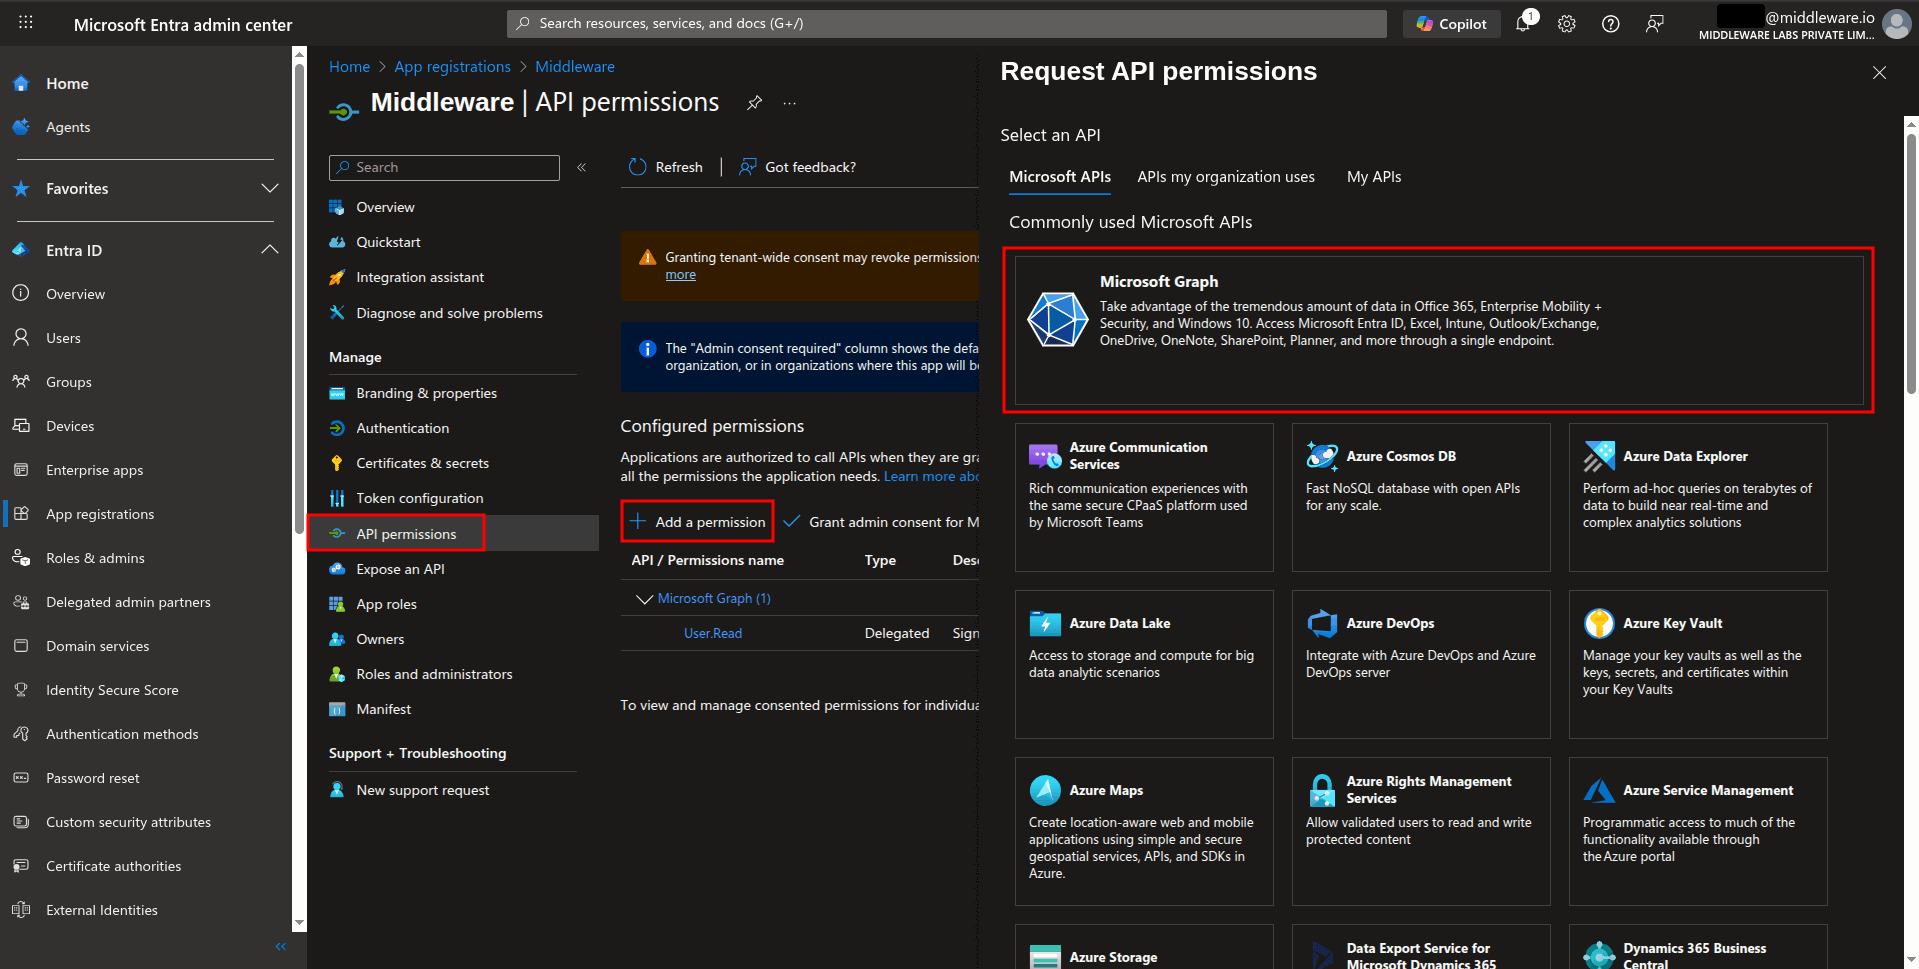
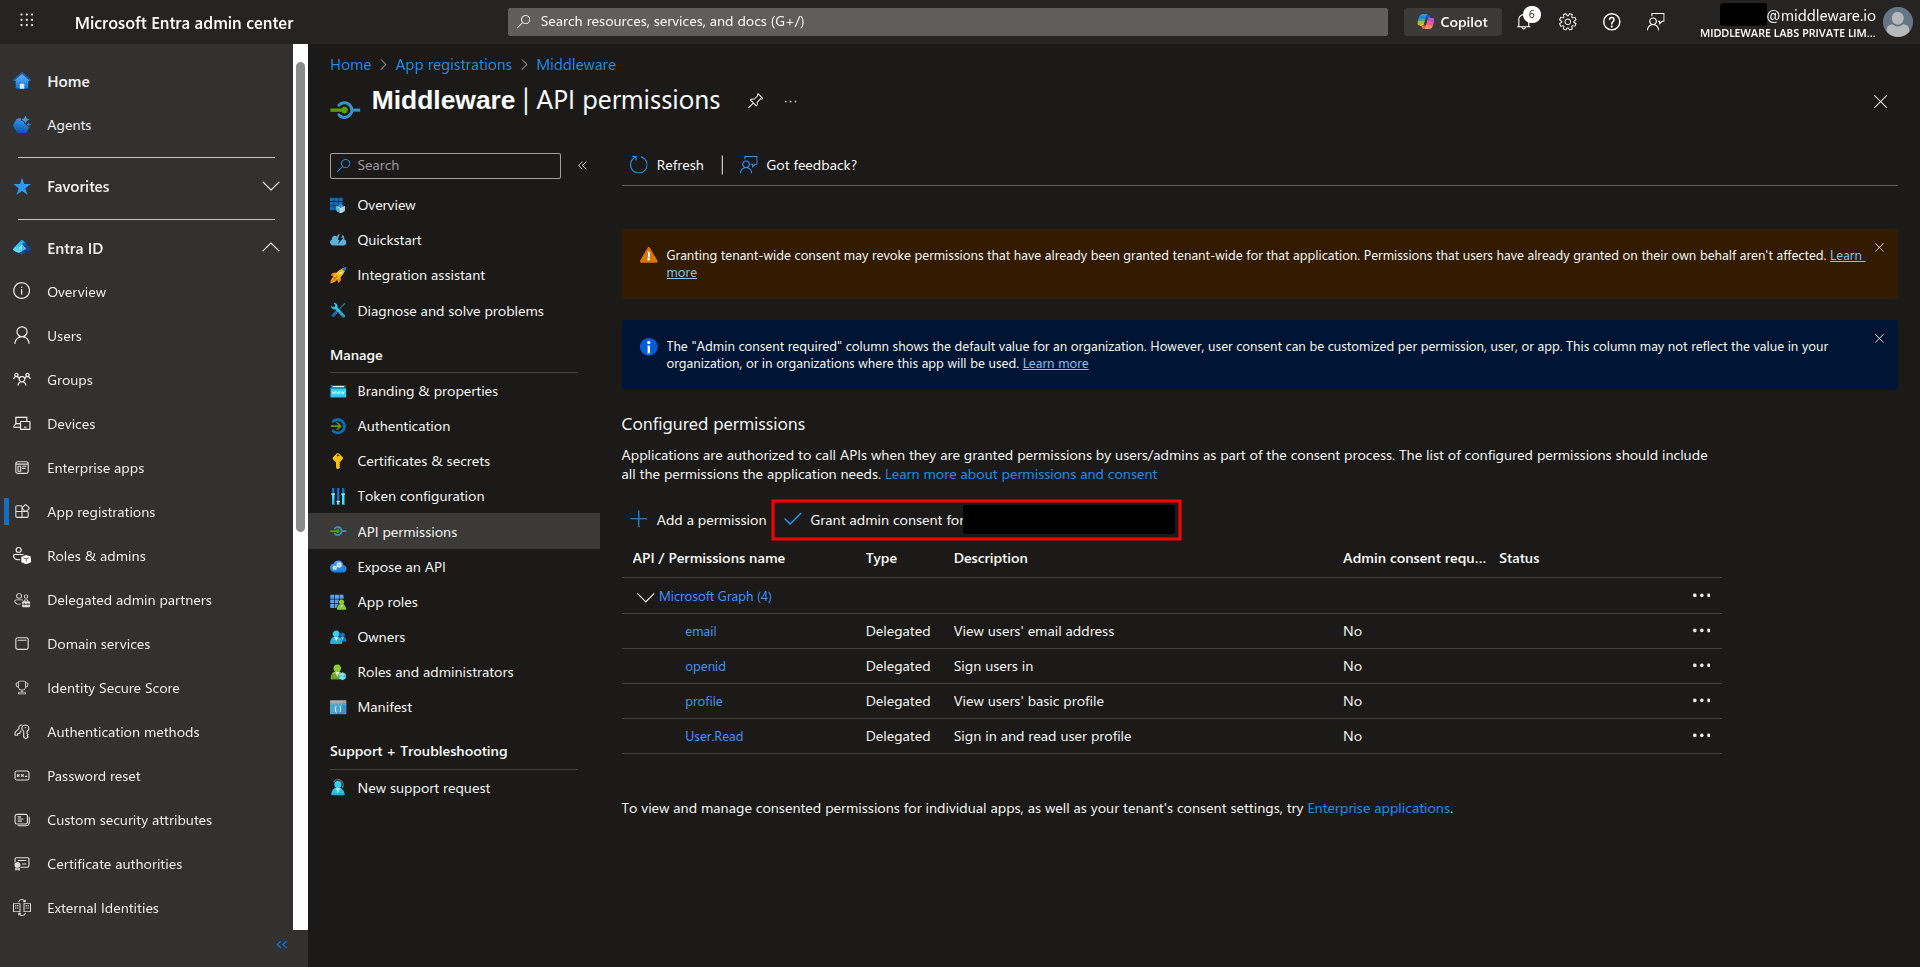
f. Select Grant admin consent to approve these permissions on behalf of all users, so individual users won’t be prompted to provide access.
Configure claims
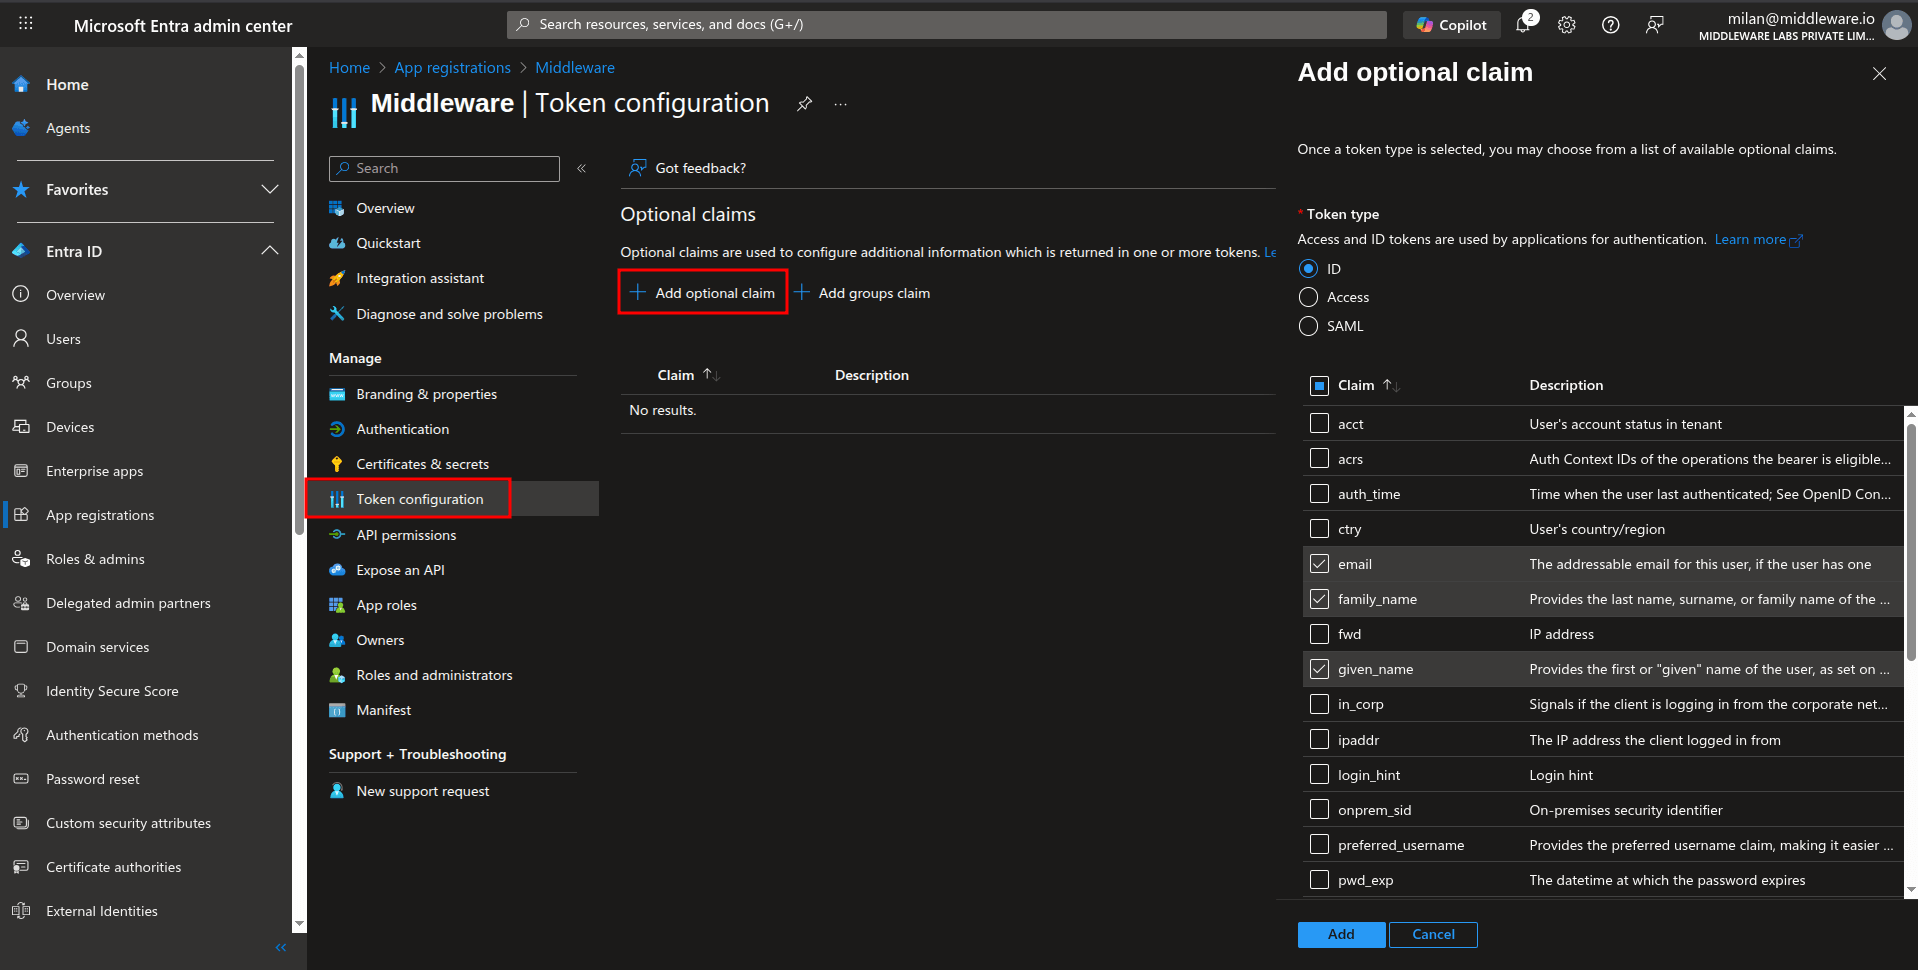
Navigate to Token configuration.
Select Add optional claim.
Select ID as the token type and choose the
upn,email,family_name, andgiven_nameclaims to add.Select Add to apply the changes.
Gather application details
After registration and configuration, collect the following information needed to submit it to the Middleware.
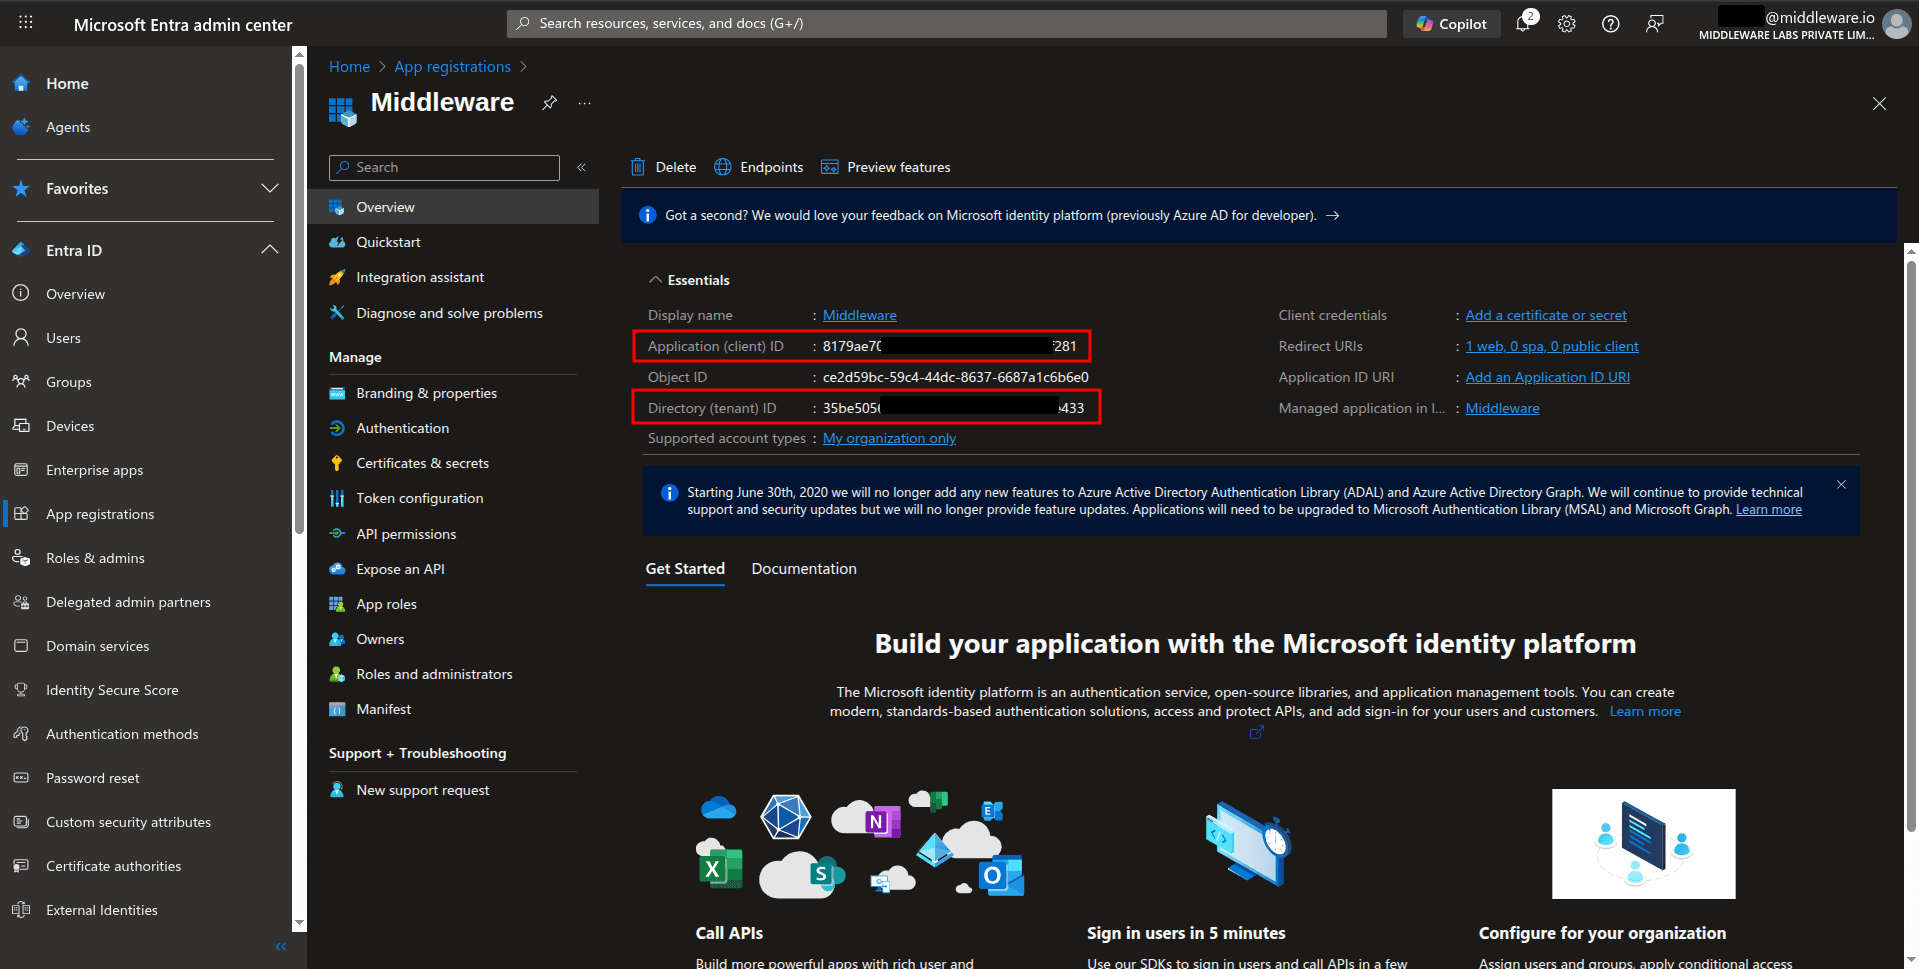
Navigate to the Overview page.
Copy the Application (client) ID and Directory (tenant) ID.
Configure Microsoft Entra ID integration in the Middleware
To enable SSO login via the OIDC protocol in the Middleware with Microsoft Entra ID:
Sign in to the Middleware as an account owner.
Browse to Installation > Integration > SSO > Microsoft Entra ID.

Select the OIDC protocol.
Paste the Client ID, Client Secret, and Tenant ID that you recorded while configuring SSO in the Microsoft Entra Admin Center, and then click Submit.
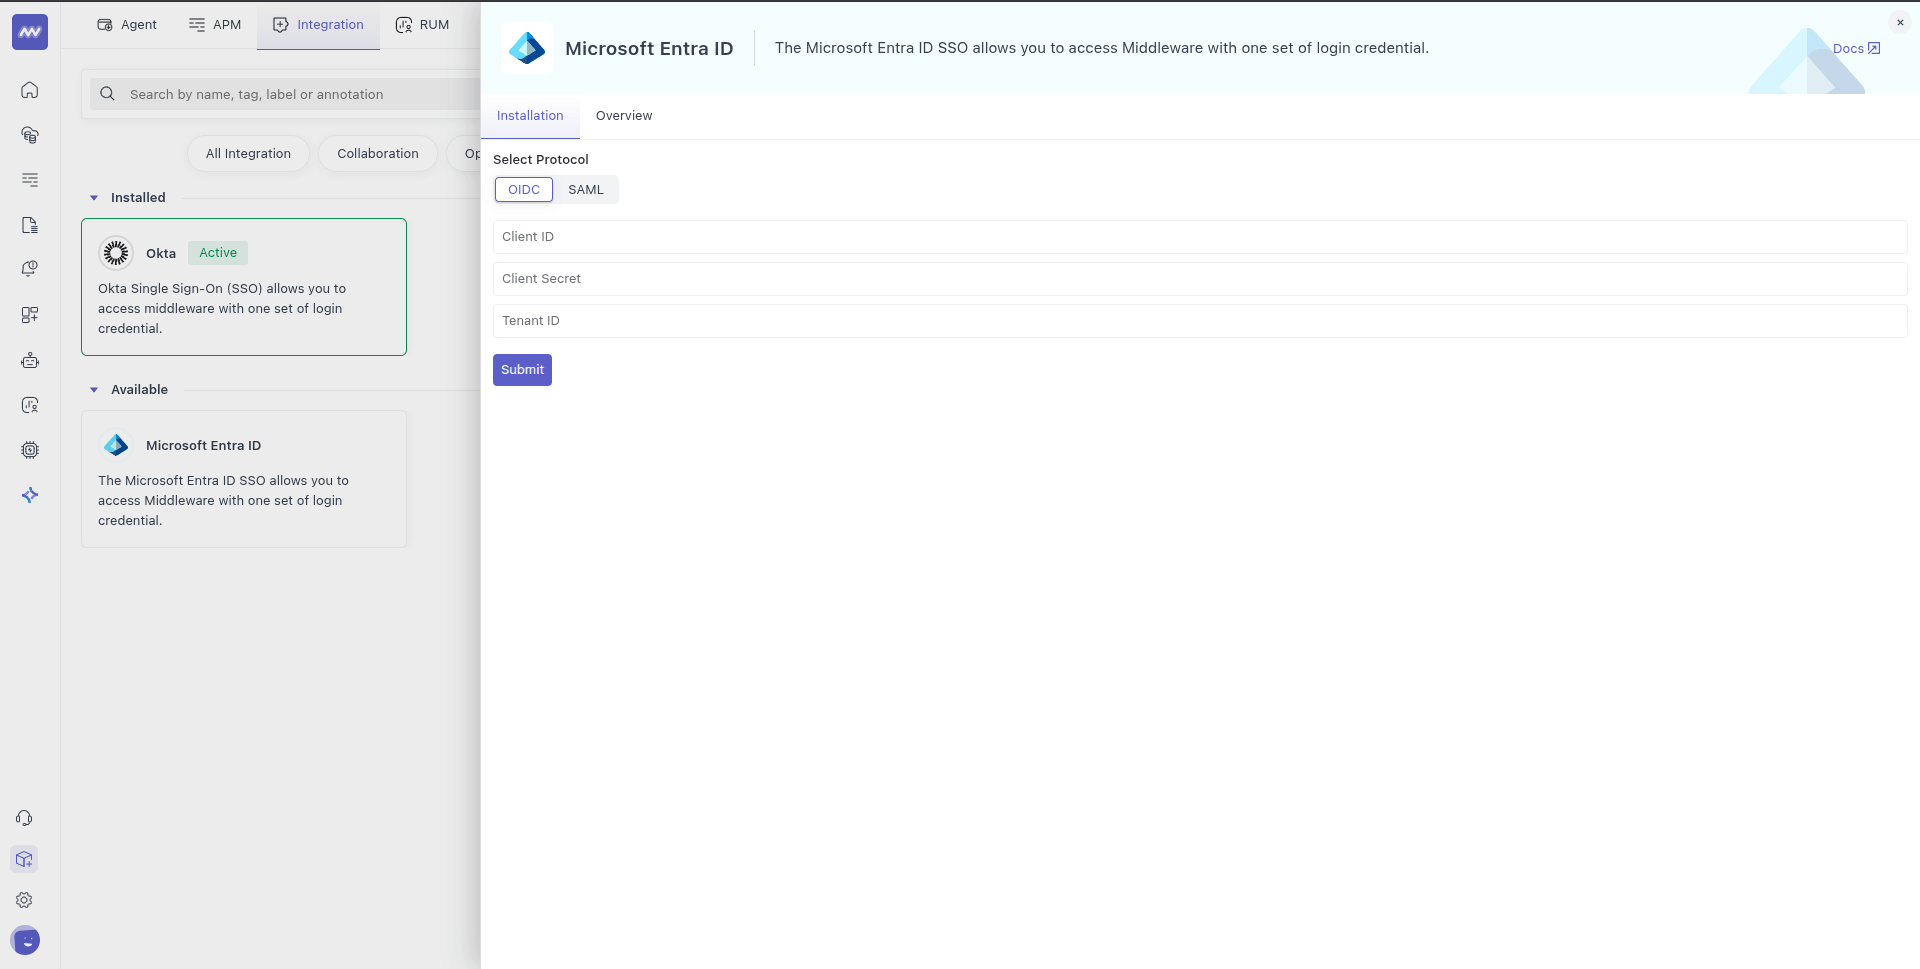
Enable users from Microsoft Entra to authenticate with Middleware
In this section, you enable users within your tenant to access Middleware.
Sign in to the Microsoft Entra admin center as at least a Cloud Application Administrator.
Browse to Entra ID > Enterprise apps > Middleware (or the name you have given while configuring the app).
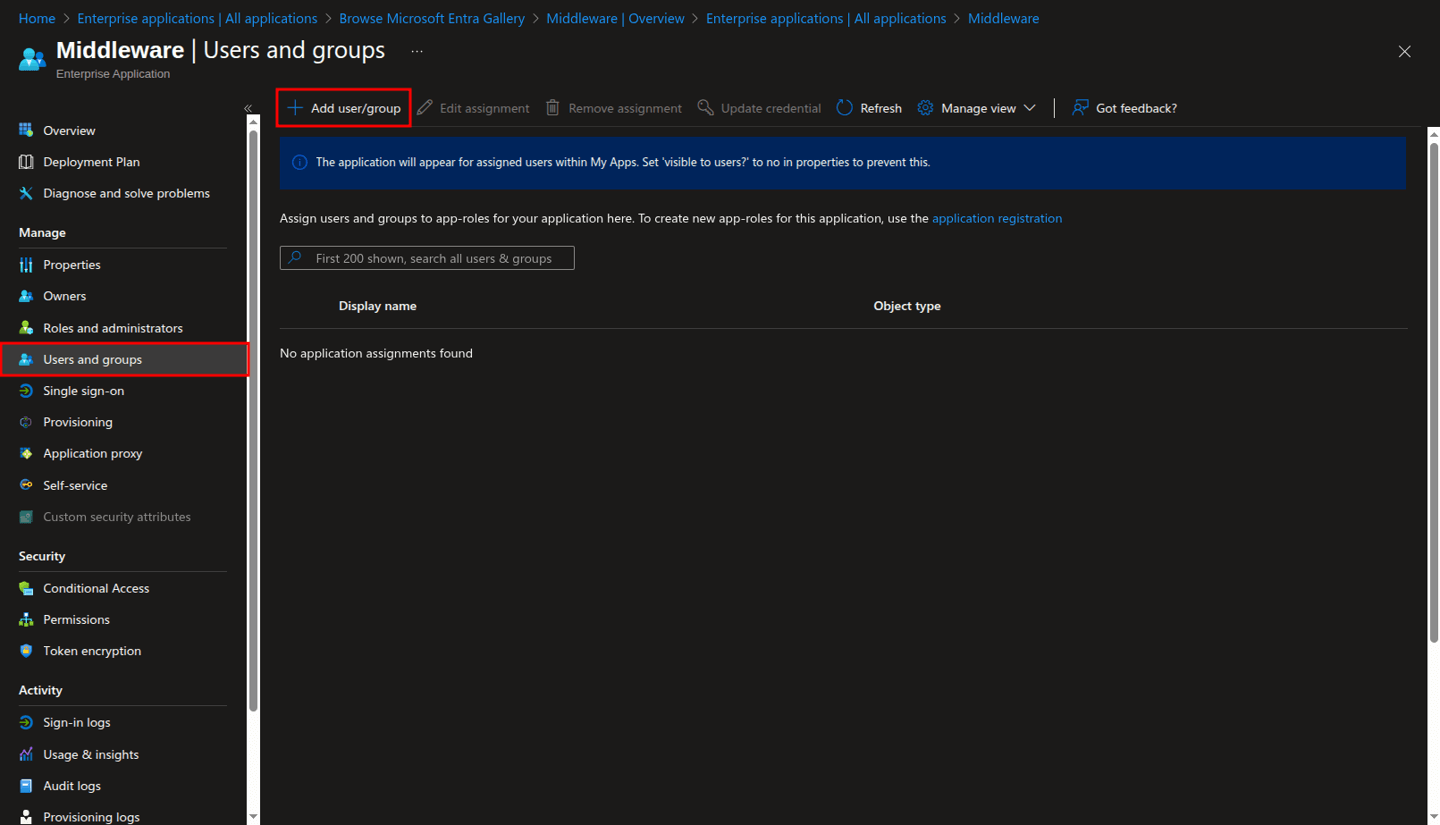
On the app's overview page, under Manage, select Users and groups.
Select Add user/group.
On the Add Assignment page, select the link under the Users field.
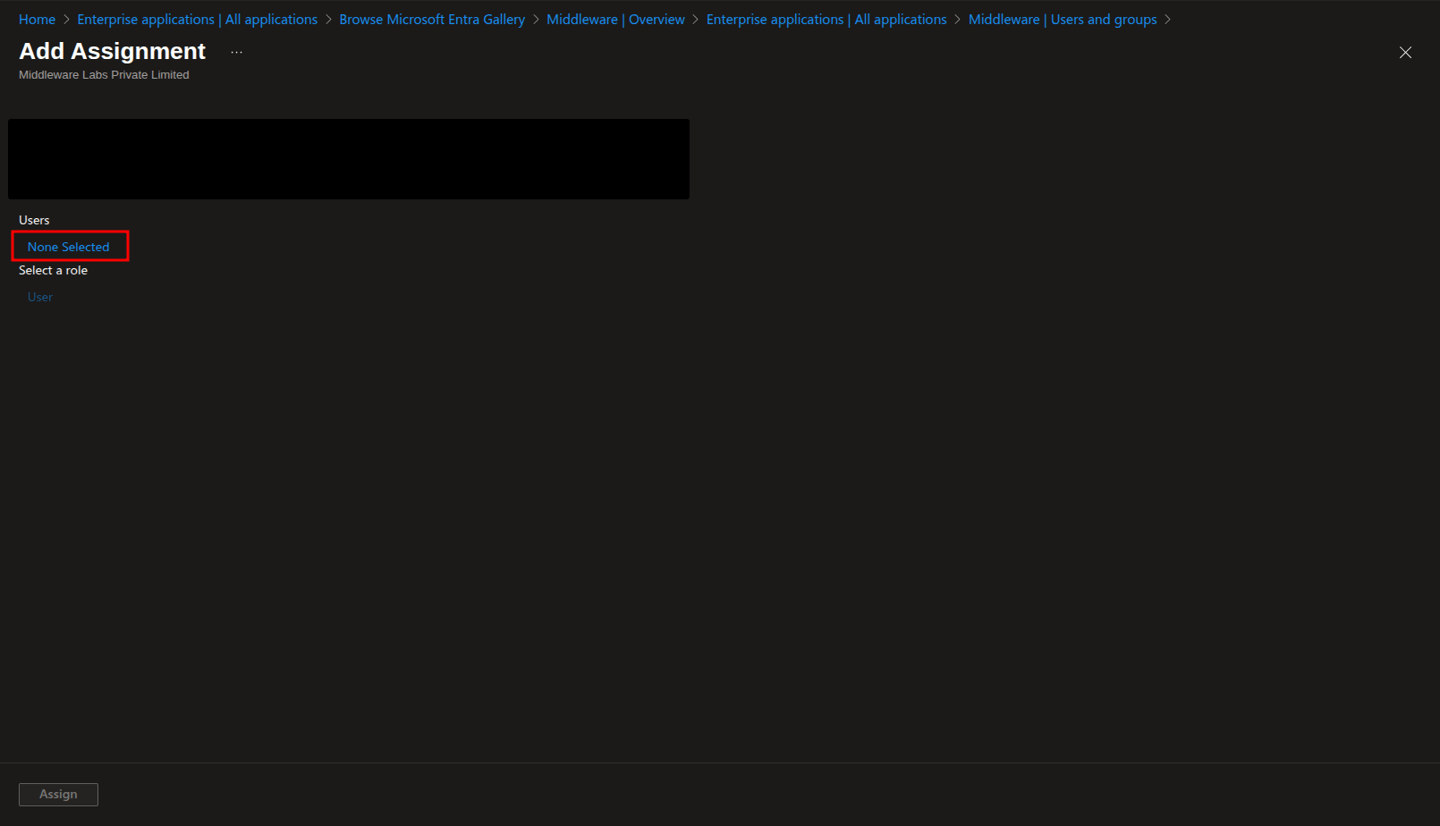
In the Users pane, you'll see a complete list of all users in your tenant. Select the users you want to give access to, then click the Select button.
Finally, click the Assign button.
Just-in-Time (JIT) User Provisioning
JIT provisioning allows you to automatically create user accounts in Middleware without manual setup.
You just need to add new users to your Middleware application in Microsoft Entra ID as described in the above section. When users log in to Middleware for the first time, their account is automatically created.
New users receive:
- Standard "user" role permissions
- Access to all available projects
JIT provisioning is only available through IdP-initiated login. New users must sign in using an IdP-initiated flow to be automatically created in Middleware. Until a user is provisioned this way, they will not be able to log in using the SP-initiated flow.
Login
Users must have the same email domain as of account owner to login.
SP-initiated login
SP-initiated, or Service Provider-initiated, means login initiated from Middleware.
Select the Microsoft Entra ID icon on the sign-in or sign-up page.
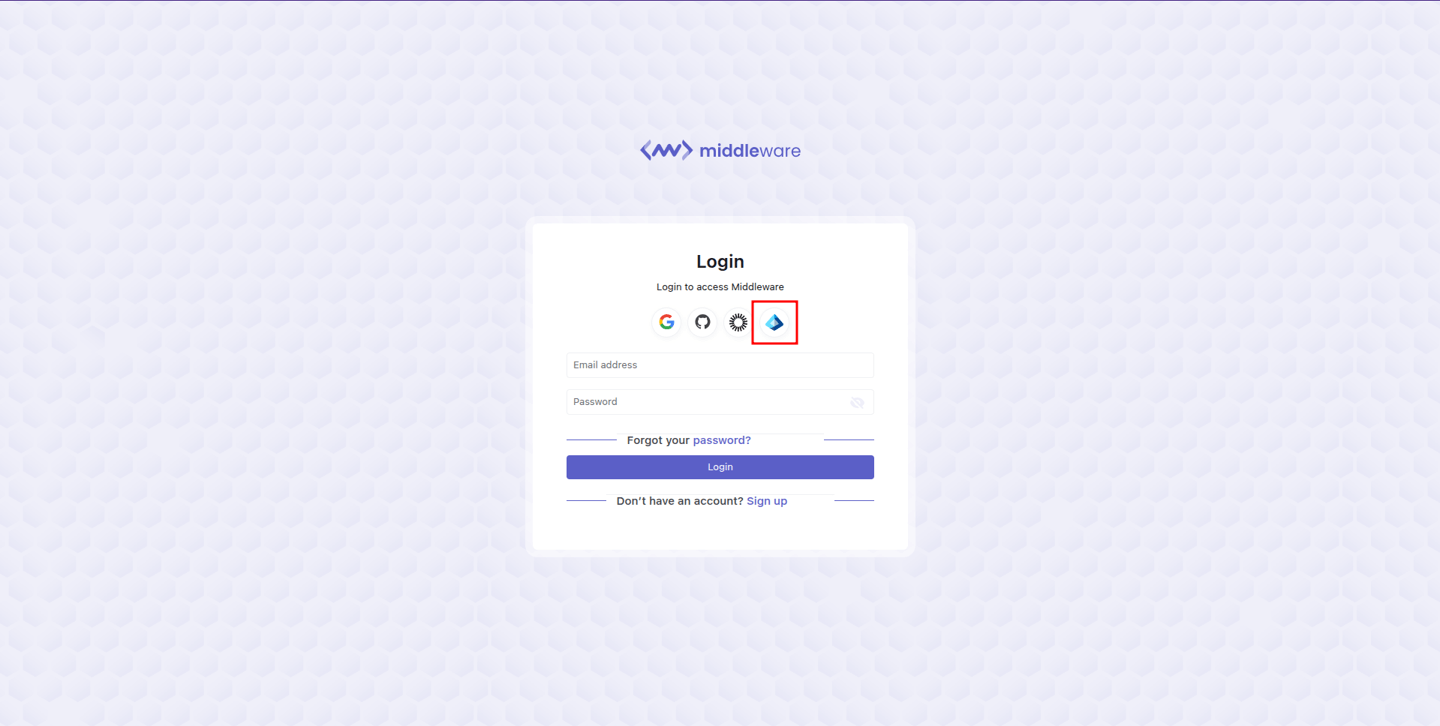
In the displayed pop-up, enter your Email Address and click Submit.
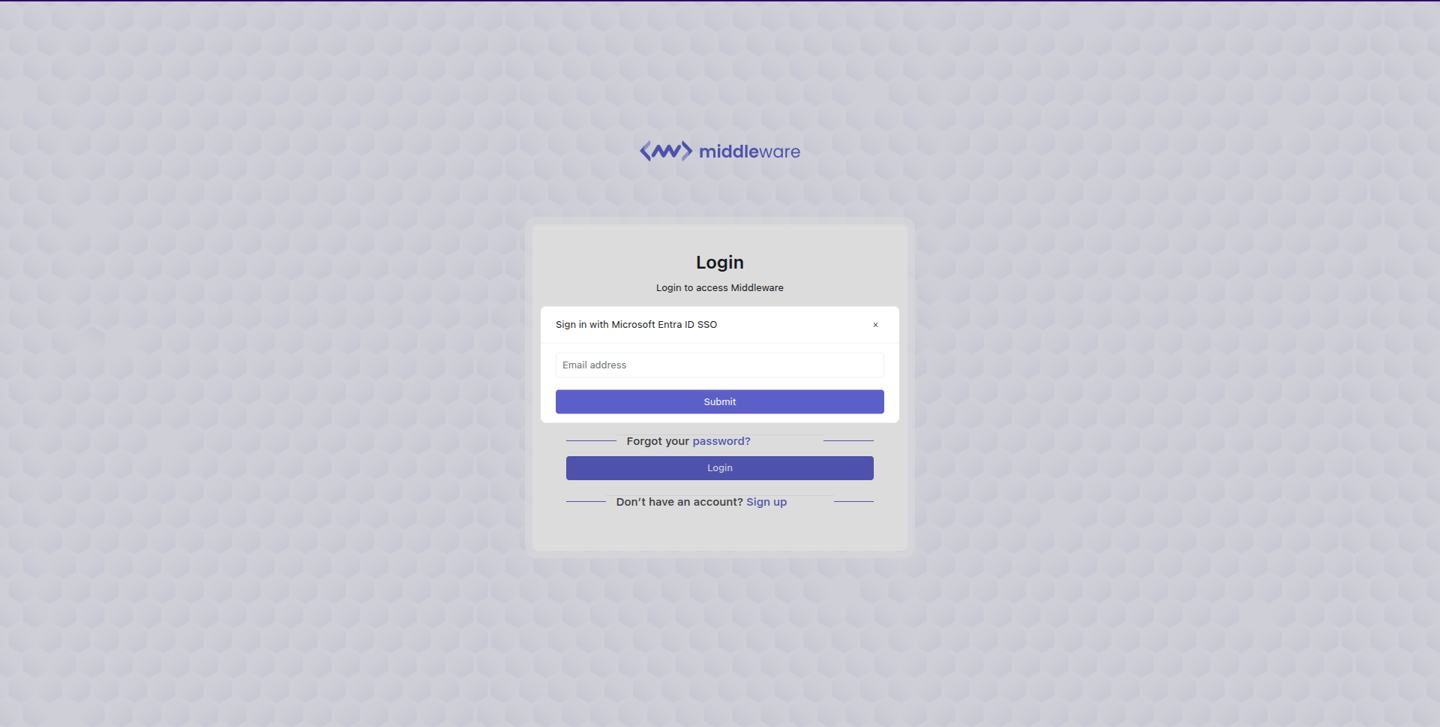
The system will initiate the authentication with Microsoft Entra ID via the configured protocol to verify your identity. If you're already signed in to your Microsoft account, you'll be automatically authenticated without any action required. If not, you'll be prompted to enter your Microsoft credentials and complete the login process. Once authentication is successful, you'll be automatically redirected back to Middleware’s home page.
IDP-initiated login
IdP-initiated, or Identity Provider-initiated, means login initiated from the Microsoft App Dashboard portal.
Go to your My Apps page in Microsoft.
Click on the Middleware app.
Once authentication is successful, you'll be automatically redirected back to Middleware’s home page.
Note: IDP-initiated login is only supported with the SAML protocol.