SQL Integration
Prerequisites
Install the MW Agent on the machine that will collect metrics. For setup instructions, refer to the Installation Guide.
Configuration
You can configure the receiver in two ways: Setting-Based (form in the UI) or User-Based (create a dedicated SQL user with minimal rights).
Setting-Based Authentication
Fill the integration form with these fields:
- Host: Machine name or IP where SQL Server runs
- Username / Password: SQL auth credentials
- Server: Server IP (e.g., 0.0.0.0 for all interfaces)
- Port: Default 1433
- Instance Name (optional): Named instance, if used
- Collection Interval (optional): Defaults to 10s
- Computer Name (optional): Host label for display
User-Based Authentication
This path uses Docker to run SQL Server and sqlcmd to create a constrained login (mw_user) with the exact permissions the docs specify.
MSSQL Docker configuration
Save the compose file:
# Create a docker-compose.yml file with the following configuration:
version: '3.1'
services:
  mssql:
    container_name: mssql-db
    hostname: mssql-db-host
    image: mcr.microsoft.com/mssql/server:2022-latest
    environment:
      ACCEPT_EULA: "Y"
      MSSQL_SA_PASSWORD: "<YourSecurePassword>"
      MSSQL_PID: 'Developer'
      MSSQL_AGENT_ENABLED: "true"
      MSSQL_TCP_PORT: 1433
      MSSQL_ENABLE_HADR: "1"
    ports:
      - "1433:1433"
    volumes:
      - mssql_data:/var/opt/mssql
    networks:
      - mssql-network

networks:
  mssql-network:

volumes:
  mssql_data:
    driver: local
Start the container:
docker-compose up -dIf SQL Server fails to start due to insufficient async I/O contexts, raise the kernel limit and retry:
sudo sysctl -w fs.aio-max-nr=1048576User Authentication Setup
Open a shell in the container:
docker exec -it --user root mssql-db bash1. Create the login and user (runs as sa):
/opt/mssql-tools18/bin/sqlcmd -S mssql-db -U sa -P '<YourSecurePassword>' \
-Q "USE master; CREATE LOGIN mw_user WITH PASSWORD = '<YourSecurePassword>'; CREATE USER mw_user FOR LOGIN mw_user;" -b -C
The -C flag is used to trust the server certificate. Without it, you may encounter the error: "SSL Provider: certificate verify failed: self-signed certificate."
Give it a quick connectivity check:
/opt/mssql-tools18/bin/sqlcmd -S localhost -U sa -P '<YourSecurePassword>' -Q "SELECT 1" -C -bYou should see 1as an output indicating successful steps:
12. Grant the required permissions:
/opt/mssql-tools18/bin/sqlcmd -S localhost -U sa -P '<YourSecurePassword>' \
-Q "USE master; GRANT VIEW SERVER STATE TO mw_user;" -C -b

/opt/mssql-tools18/bin/sqlcmd -S localhost -U sa -P '<YourSecurePassword>' \
-Q "USE master; GRANT SELECT ON sys.dm_exec_requests TO mw_user;" -C -b
3. Confirm the user can read from DMVs:
/opt/mssql-tools18/bin/sqlcmd -S localhost -U mw_user -P '<YourSecurePassword>' \
-Q "USE master; SELECT * FROM sys.dm_exec_requests;" -C -b
Access Integrations
1 Access SQL Server Integration
Open Installations → All Integrations → SQL Server.
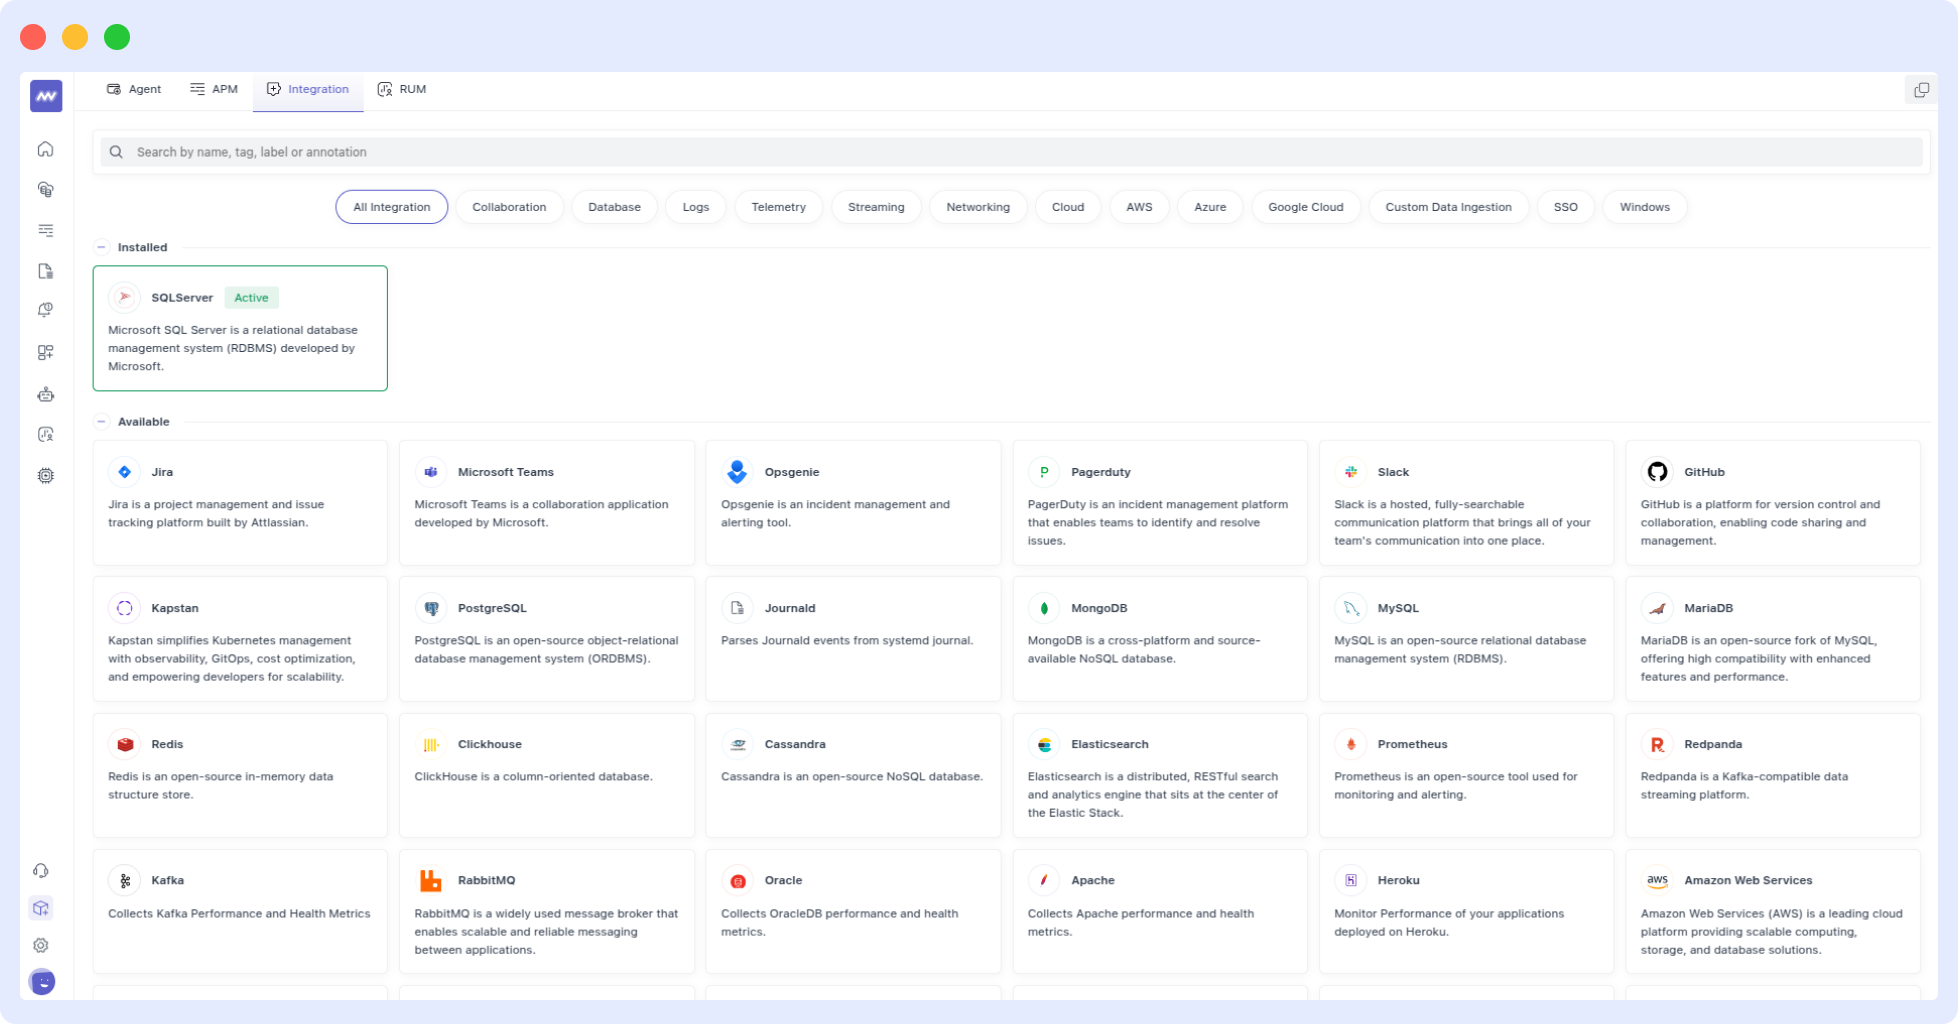
2 Configure the SQL Server Integration
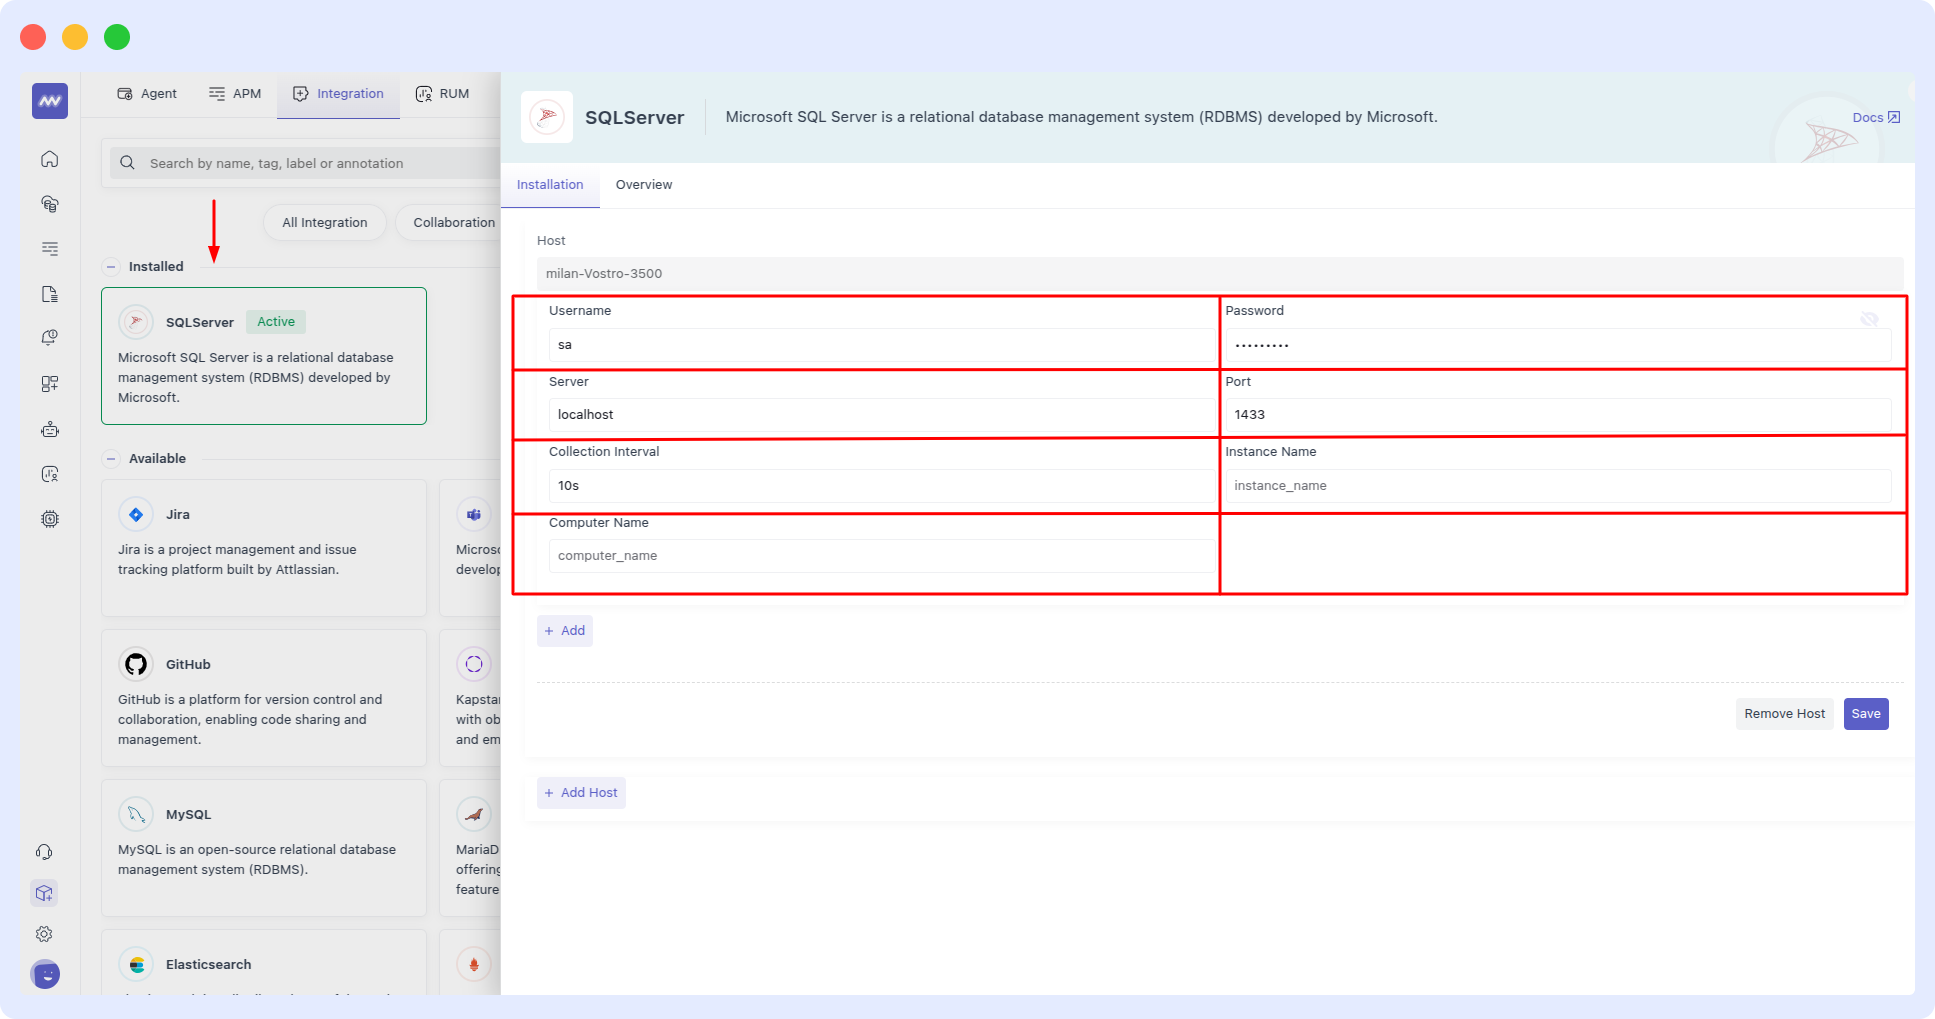
Enter the server the following details and then hit the save button:
- Collection Interval (Optional): Specify the interval at which telemetry data is collected. In this configuration, two intervals are defined: 10s and 5s.
- Computer Name (Optional): Set the computer name for the SQL Server instance. Here, it is CustomServer.
- Instance Name (Optional): Define the specific SQL Server instance. Here, it is CustomInstance.
- Authentication: Provide authentication details (username and password). In this case, the username is sqlserver and the password is sqlserver.
- Server Address: Specify the server IP or hostname. Here, it is 0.0.0.0.
- Port: Define the port used by SQL Server. The default port is 1433
Visualize Analytics
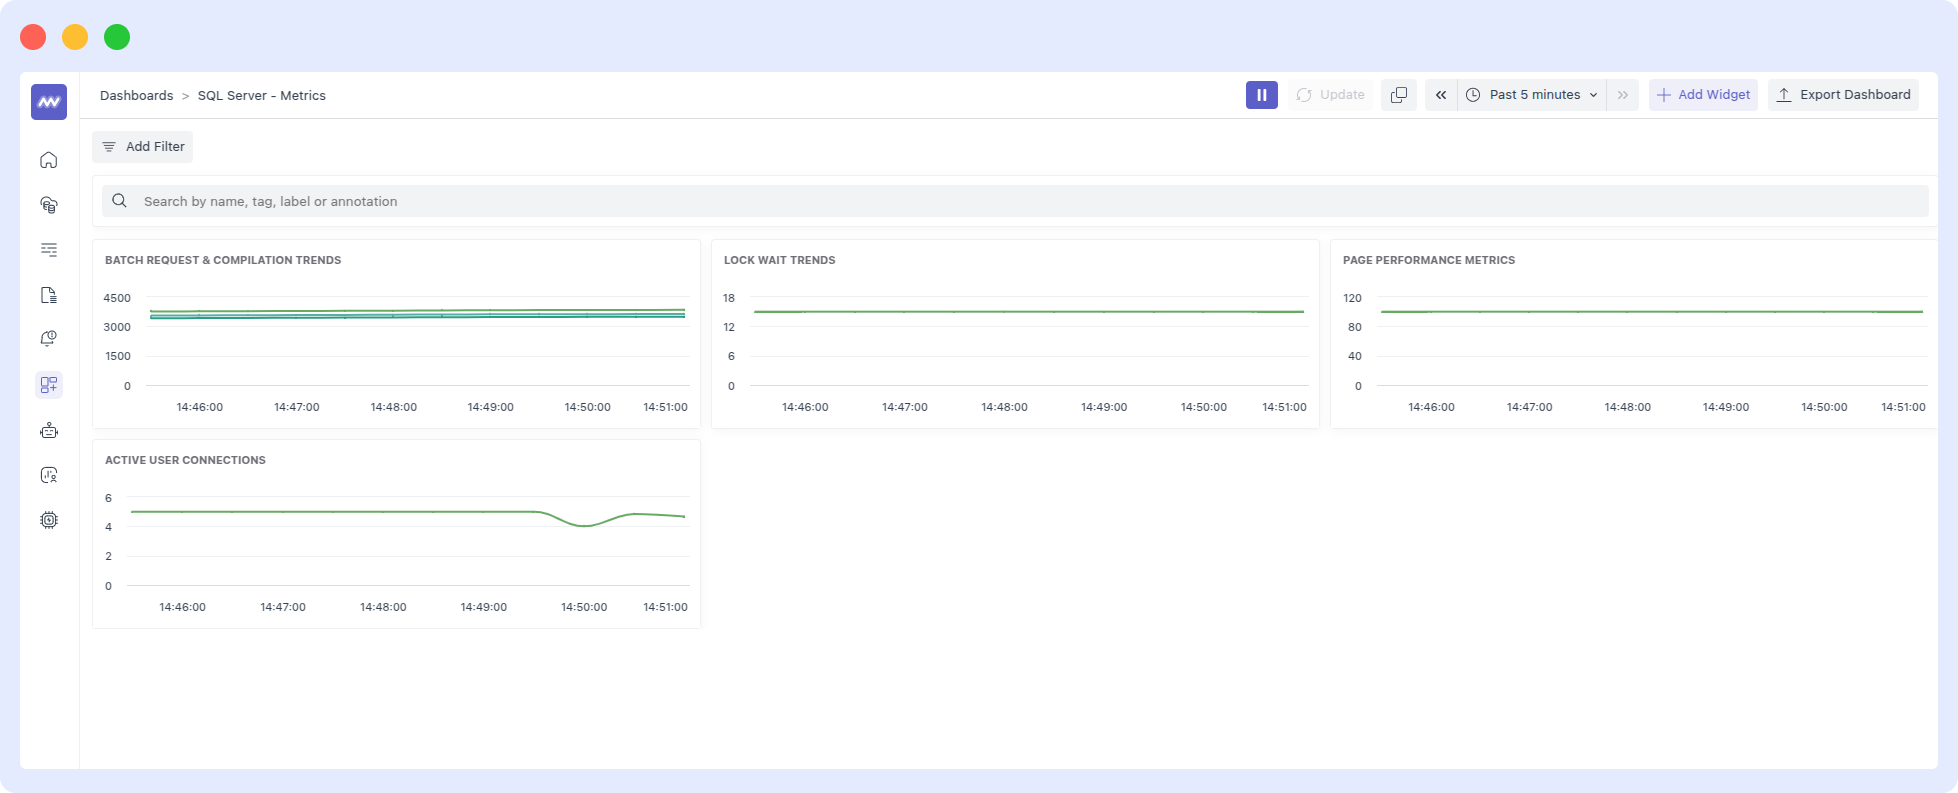
Once the SQL Server integration setup is complete, a new SQL Server-specific dashboard will appear in the Dashboard Builder. This default dashboard serves as a jumping off point for visualizing and analyzing SQL Server data.
Create SQL Server Widget
You can add SQL Server data to dashboards as a custom widget. Follow these steps to configure your widget:
- Select Widget Dashboard. Navigate to the Create Widget screen.
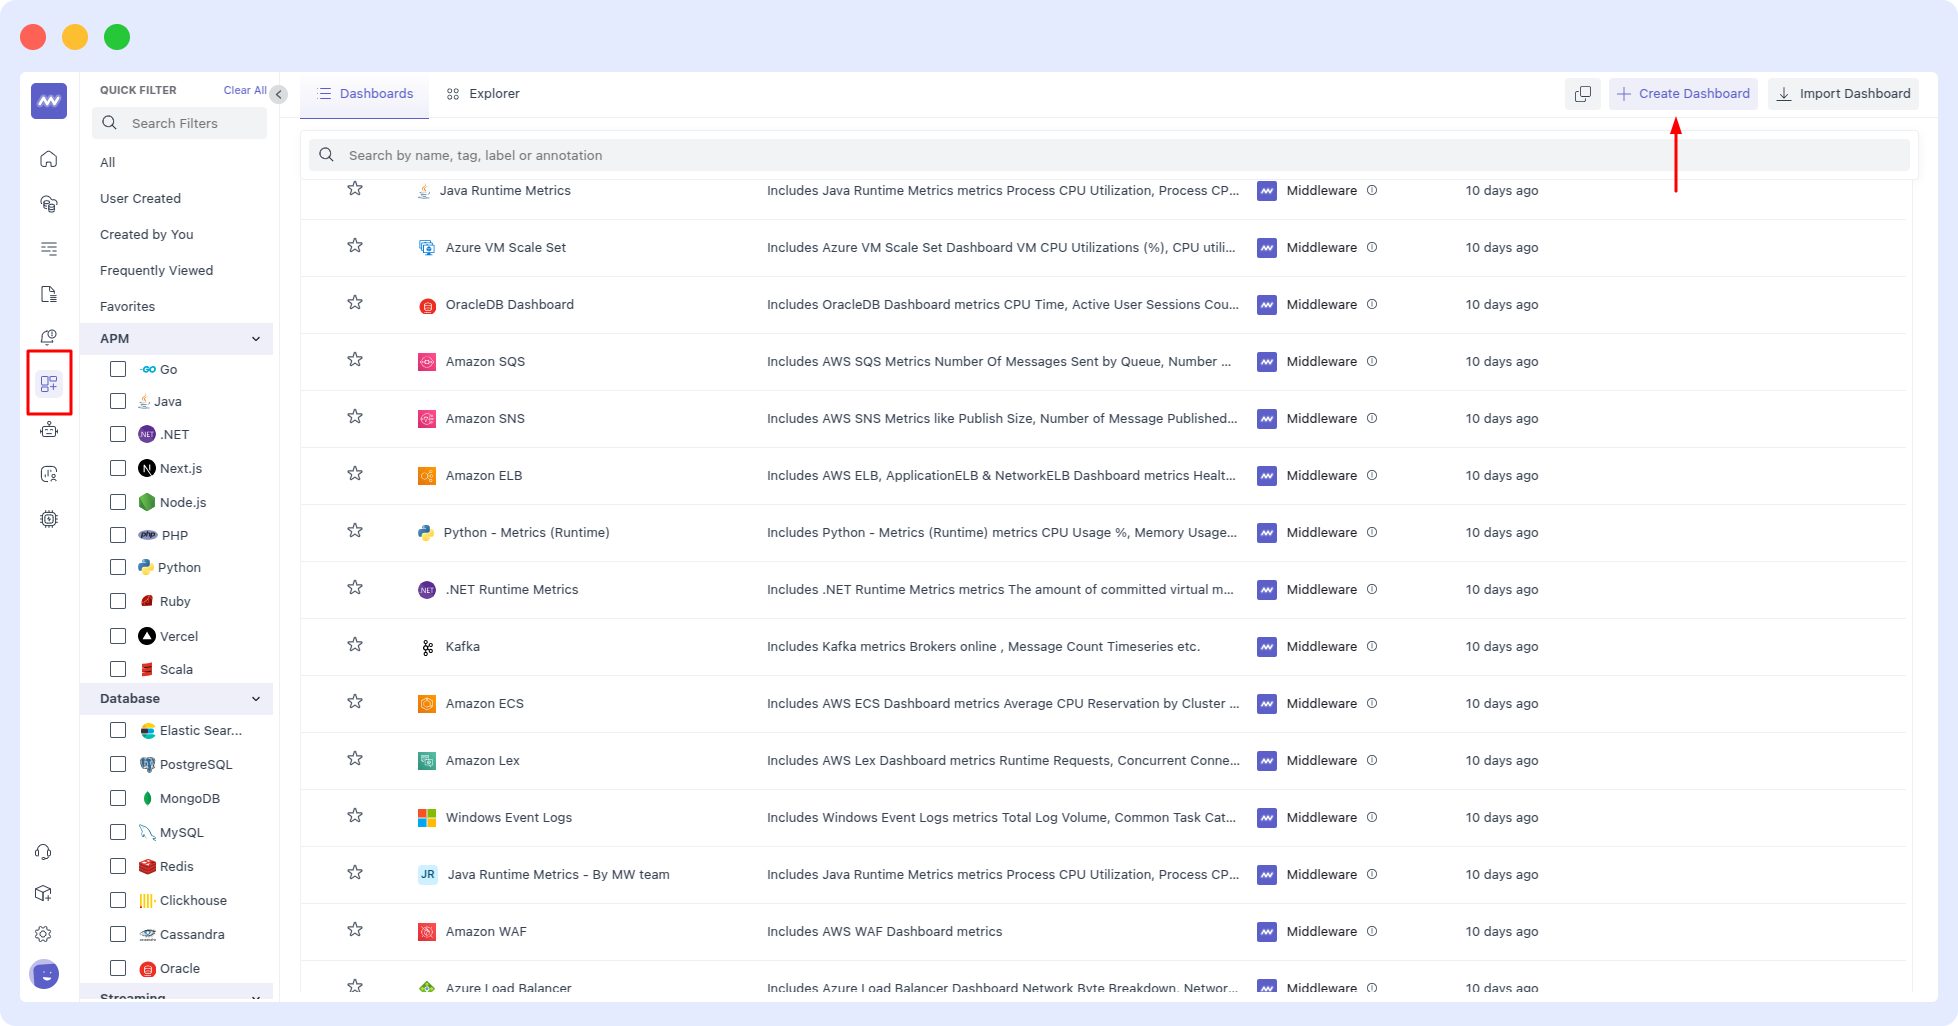
- Configure Widget Profile On the Widget Profile screen, define the widget name and description.
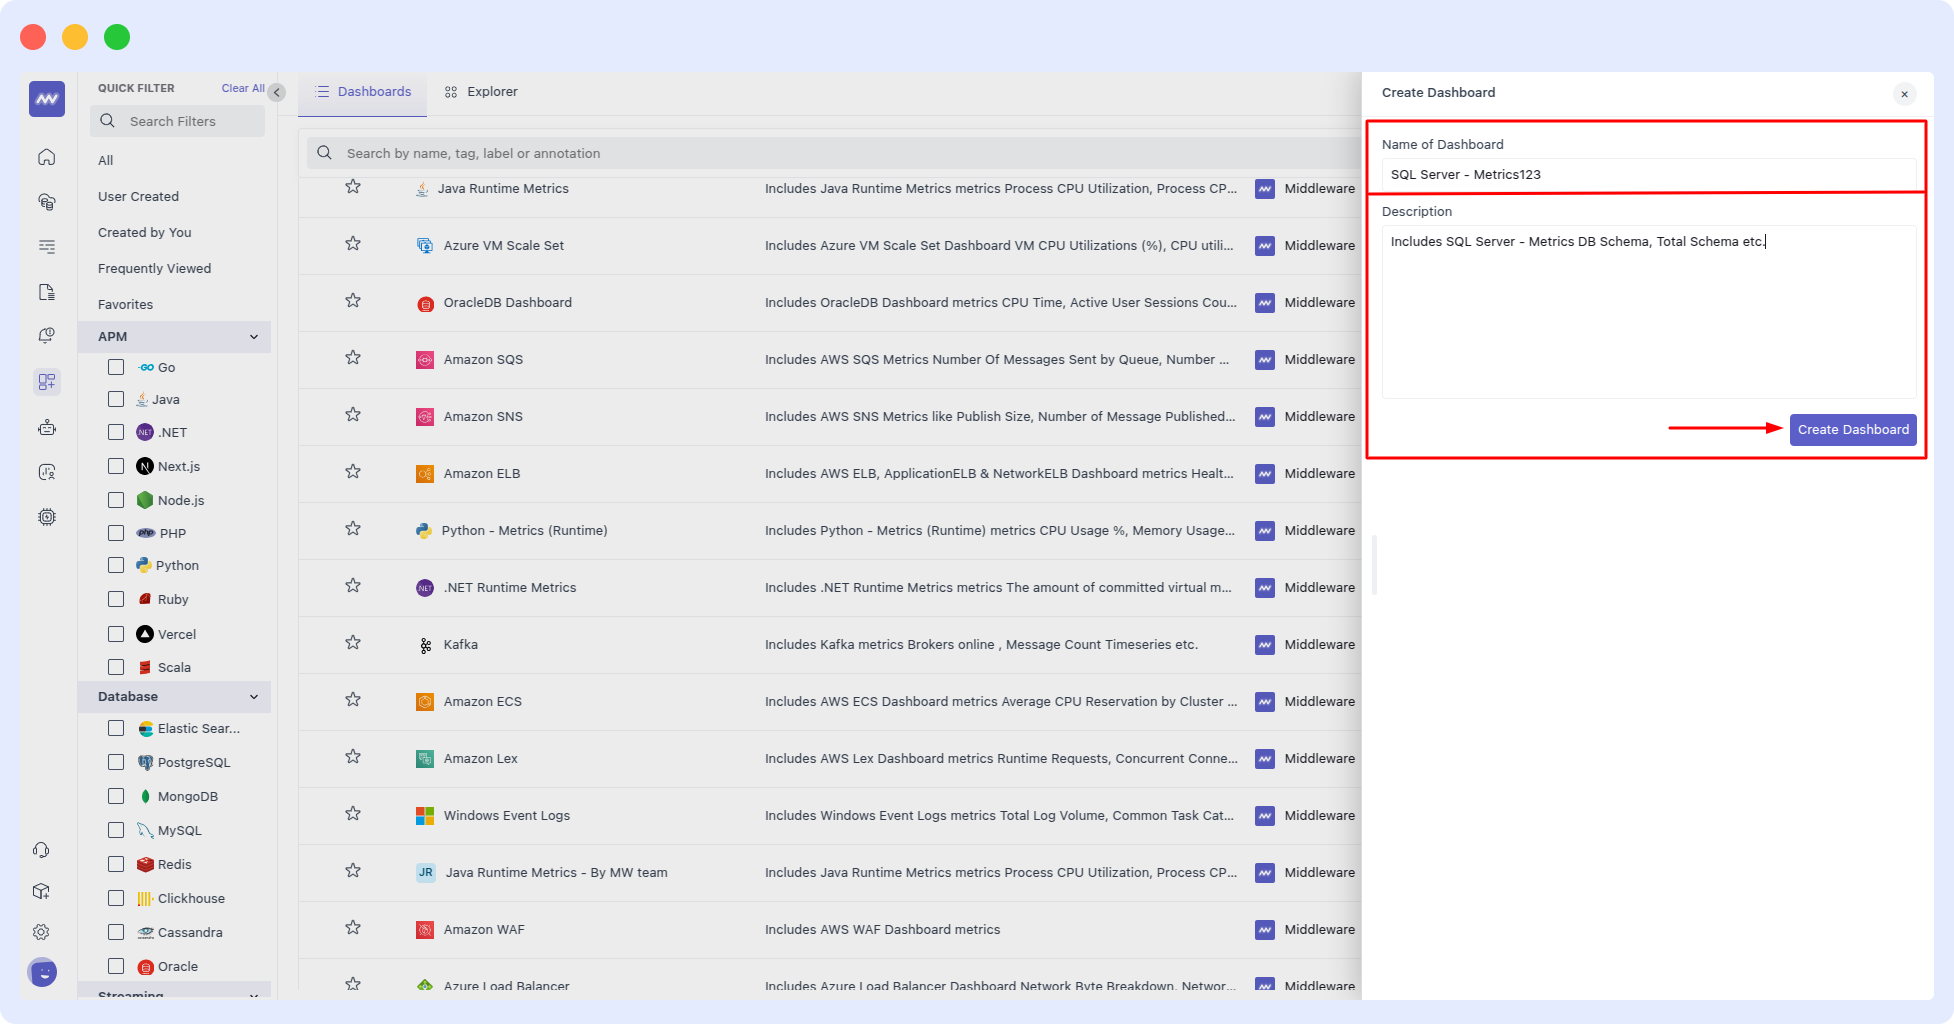
- Set Up Configuration In the Widget Configuration screen, customize data settings, apply filters, and finalize widget preferences.
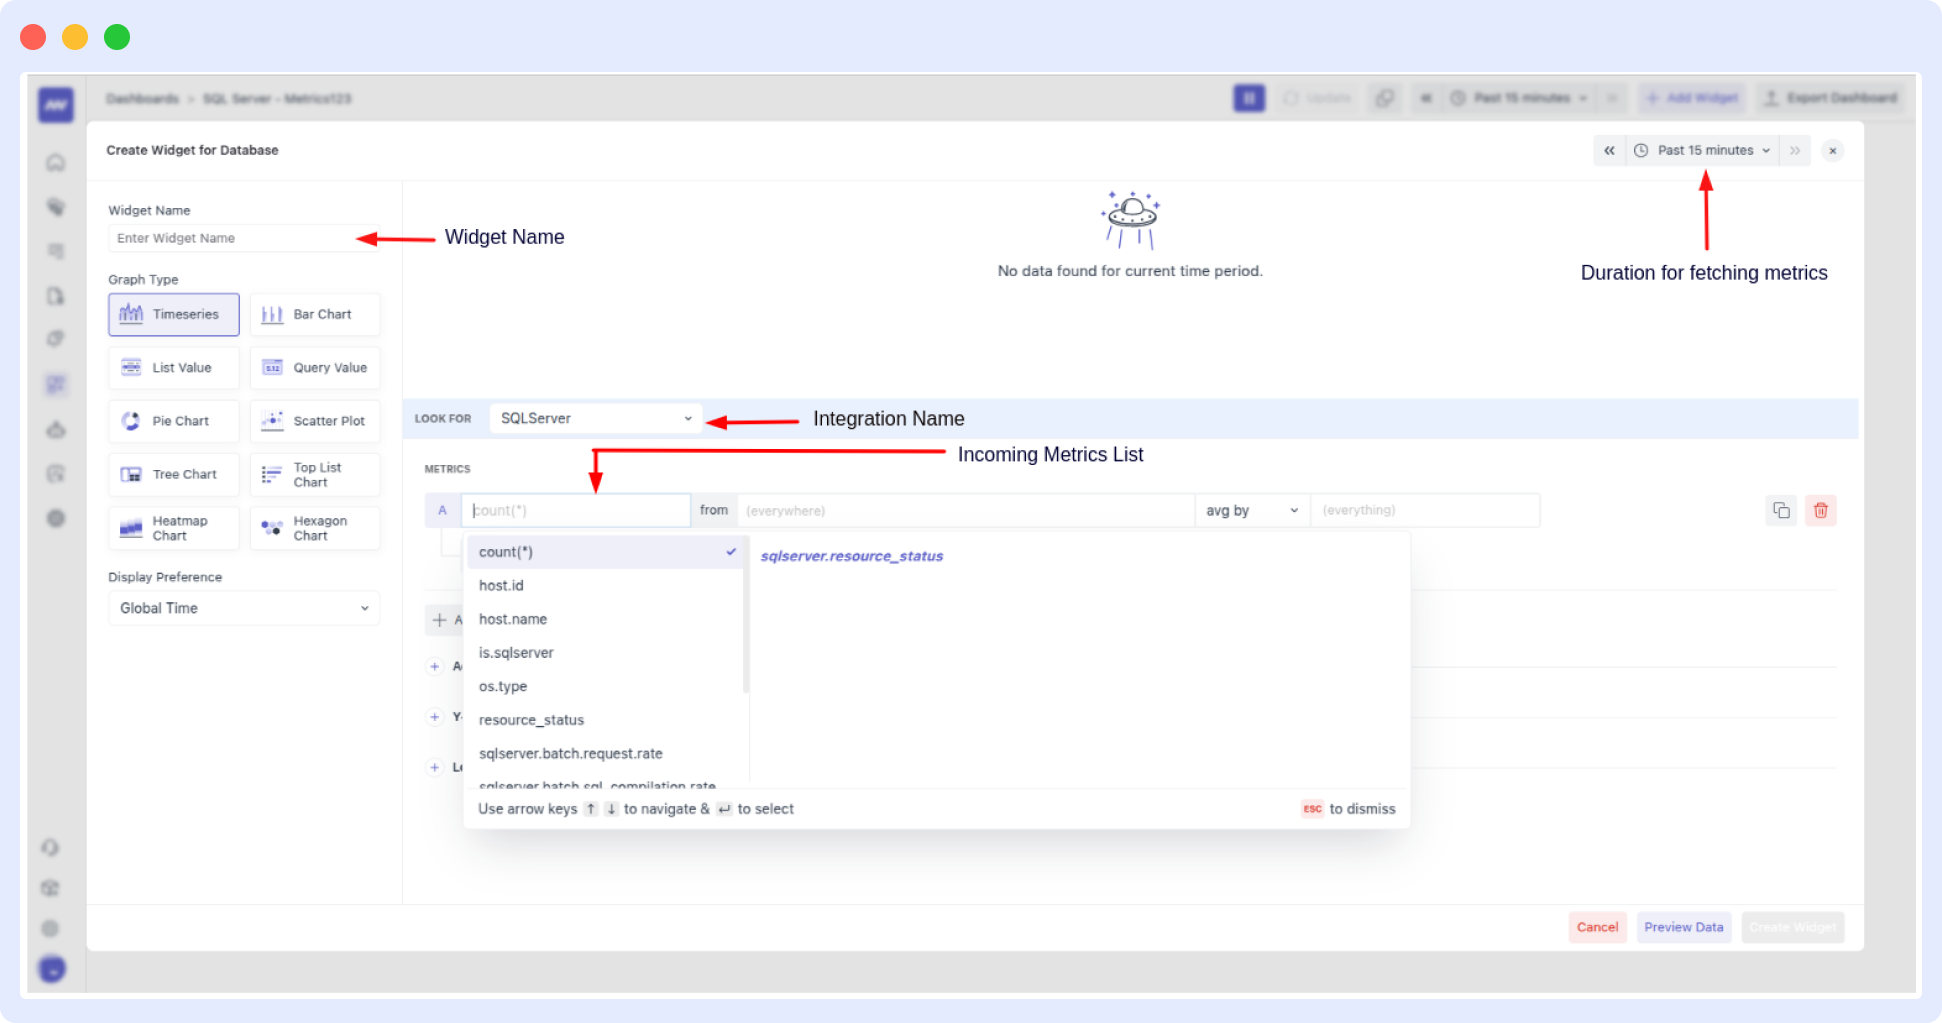
Alerts
Alerts can be configured for any SQL Server metrics. When creating a new rule, select the Database detection method and SQL Server database type for available metrics to appear in the Metrics dropdown list. Select the desired metric and continue configuring the alert conditions.
Metrics Collected
| Metric | Description |
|---|---|
sqlserver.batch.request.rate | Number of batch requests received by SQL Server. |
sqlserver.batch.sql_compilation.rate | Number of SQL compilations needed. |
sqlserver.batch.sql_recompilation.rate | Number of SQL recompilations needed. |
sqlserver.lock.wait.rate | Number of lock requests resulting in a wait. |
sqlserver.lock.wait_time.avg | Average wait time for all lock requests that had to wait. |
sqlserver.page.buffer_cache.hit_ratio | Pages found in the buffer pool without having to read from disk. |
sqlserver.page.checkpoint.flush.rate | Number of pages flushed by operations requiring dirty pages to be flushed. |
sqlserver.page.lazy_write.rate | Number of lazy writes moving dirty pages to disk. |
sqlserver.page.life_expectancy | Time a page will stay in the buffer pool. |
sqlserver.page.operation.rate | Number of physical database page operations issued. |
sqlserver.page.split.rate | Number of pages split as a result of overflowing index pages. |
sqlserver.transaction.rate | Number of transactions started for the database (not including XTP-only transactions). |
sqlserver.transaction.write.rate | Number of transactions that wrote to the database and committed. |
sqlserver.transaction_log.flush.data.rate | Total number of log bytes flushed. |
sqlserver.transaction_log.flush.rate | Number of log flushes. |
sqlserver.transaction_log.flush.wait.rate | Number of commits waiting for a transaction log flush. |
sqlserver.transaction_log.growth.count | Total number of transaction log expansions for a database. |
sqlserver.transaction_log.shrink.count | Total number of transaction log shrinks for a database. |
sqlserver.transaction_log.usage | Percent of transaction log space used. |
sqlserver.user.connection.count | Number of users connected to the SQL Server. |
sqlserver.database.count | The number of databases. |
sqlserver.database.io | The number of bytes of I/O on this file. |
sqlserver.database.latency | Total time that the users waited for I/O issued on this file. |
sqlserver.database.operations | The number of operations issued on the file. |
sqlserver.processes.blocked | The number of processes that are currently blocked. |
sqlserver.resource_pool.disk.throttled.read.rate | The number of read operations that were throttled in the last second. |
sqlserver.resource_pool.disk.throttled.write.rate | The number of write operations that were throttled in the last second. |
Troubleshooting
Missing Integrations Menu:
- If you don’t see Integrations in Middleware, your role is missing the Installation permission. Ask an admin to grant it in Settings.
MSSQL container doesn’t start:
- Raise async I/O contexts and start again:
sudo sysctl -w fs.aio-max-nr=1048576
docker-compose up -d
sqlcmd SSL certificate verify failed
- Include
-Cwithsqlcmd(as shown in the docs) to trust the server certificate in test setups.
User can’t read metrics:
- Re-run the two GRANTs from above and test with:
/opt/mssql-tools18/bin/sqlcmd -S localhost -U mw_user -P '<YourSecurePassword>' \
-Q "USE master; SELECT * FROM sys.dm_exec_requests;" -C -b
Need assistance or want to learn more about Middleware? Contact our support team at [email protected] or join our Slack channel.